

How to Keep a Charcoal Grill Hot: Expert Tips for Perfect Cooking
Keeping a charcoal grill hot isn't some dark art. It's really about getting three things right: the fuel you use, how you arrange the coals, and how you manage airflow. Nail these fundamentals, and you'll go from frustrating cooks that start hot and end lukewarm to getting predictable, delicious results every single time. This is the foundation for unlocking what your grill can really do.
The Three Pillars of Consistent Grill Heat
Ever had a grill that’s roaring hot one minute, only to die down right when you throw the steaks on? It’s a classic problem, and it almost always points back to a failure in one of three key areas. The trick is to stop thinking about heat as a single action and start seeing it as a system where fuel, setup, and oxygen all have to work together.
This process starts way before you ever light a single briquette. You absolutely have to start with a clean grill. Leftover ash from your last cookout is a heat killer—it blocks the air vents and literally chokes the fire of the oxygen it needs to burn hot and steady.
Fuel Selection and Airflow
Good airflow and quality charcoal are the twin engines of a hot grill. As the experts from Weber Grills point out, that old ash can also trap moisture, which will lead to rust and corrosion over time. So, regular cleaning isn't just about performance; it’s about making your equipment last.
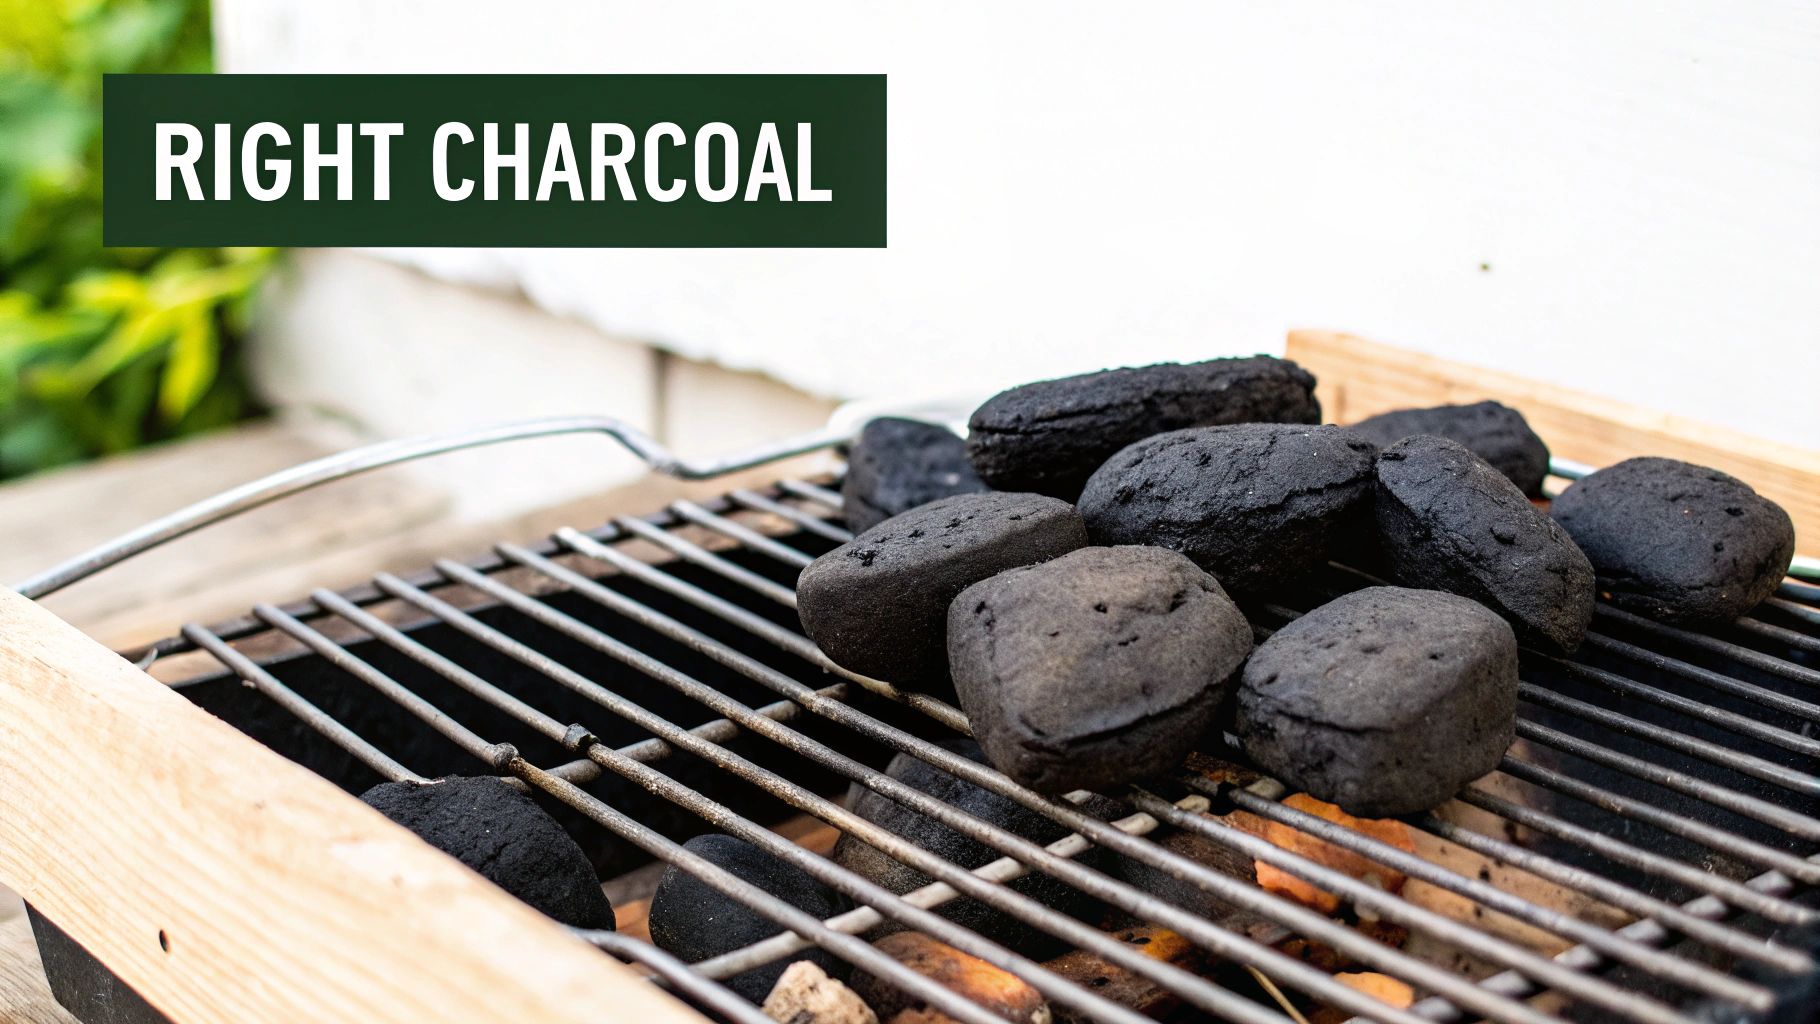
Beyond a clean slate, the charcoal you choose plays a massive role. I've found that using fresh, dry charcoal briquettes gives you a much more predictable and even burn. Lump charcoal is great, but the inconsistent sizes can lead to burn rates that are all over the map.
Why These Elements Matter
Getting a handle on these pillars is so critical because they are your direct line to controlling the temperature. A grill is a pretty simple machine, but it’s your management of these variables that makes it effective.
Here’s a quick look at why each one is a non-negotiable part of the process:
- Quality Fuel: Your choice between briquettes and lump charcoal really sets the stage for how long your heat will last and how intense it will be. But no matter what you choose, it has to be fresh and dry for a strong start.
- Strategic Arrangement: How you pile your coals is how you create your cooking zones. A well-built fire gives you that screaming hot spot for searing and cooler areas for indirect cooking.
- Mastered Airflow: The vents are your temperature dial. It’s that simple. More air means a hotter fire; less air cools things down. It’s a basic concept, but it's incredibly powerful once you get the feel for it.
To help you remember these core concepts, here is a quick summary table.
Quick Guide to Maintaining Grill Heat
This table breaks down the three essential factors for keeping your charcoal grill hot from start to finish.
| Factor | Why It's Critical | Actionable Tip |
|---|---|---|
| Clean Grill & Quality Fuel | Old ash blocks vents, choking the fire. Damp or old charcoal burns inconsistently and produces less heat. | Always start by cleaning out old ash. Use fresh, dry charcoal briquettes for the most predictable and even burn. |
| Strategic Coal Arrangement | The way you pile your coals creates different heat zones, allowing for both direct searing and indirect cooking. | For high heat, pile coals in a concentrated mound. For two-zone cooking, bank them all to one side of the grill. |
| Mastering Airflow | Vents are your grill's temperature control. Oxygen is the fuel for fire; controlling its supply directly controls the heat. | Open the bottom and top vents fully to get the grill ripping hot. To lower the temp, partially close the top vent first. |
Mastering these three areas will fundamentally change your grilling game.
Takeaway: Consistent grill heat isn't luck. It's a method. It begins with a clean grill, good fuel, and a real understanding of how airflow dictates your temperature. Master these, and you'll master your grill.
Arranging Charcoal for Long Lasting Heat
The secret to a fire that lasts isn't just about what fuel you choose, but how you build it. How you arrange your coals directly creates different heat profiles, giving you the power to go from a blistering sear to a gentle, slow roast.
Mastering a couple of basic setups will completely change your grilling game. Seriously.
The Two-Zone Fire: Your Grilling Workhorse
For most backyard cooks, the most versatile setup is a two-zone fire. This is the absolute workhorse of charcoal grilling, giving you both high, direct heat and a cooler, indirect zone in one simple configuration.
The idea is simple: just pile all your lit coals on one side of the grill. That creates a powerful searing area, perfect for getting a great crust on steaks, burgers, or charring up some vegetables.
The other side, left empty, becomes your safe zone. This setup gives you total control. You can move food from the intense heat over to the cooler side to finish cooking gently without burning it to a crisp. If you want to dive deeper into this essential skill, check out our detailed guide on the fundamentals of indirect cooking on a grill.
This diagram gives you a clear top-down view of how a two-zone fire looks inside a classic kettle grill.
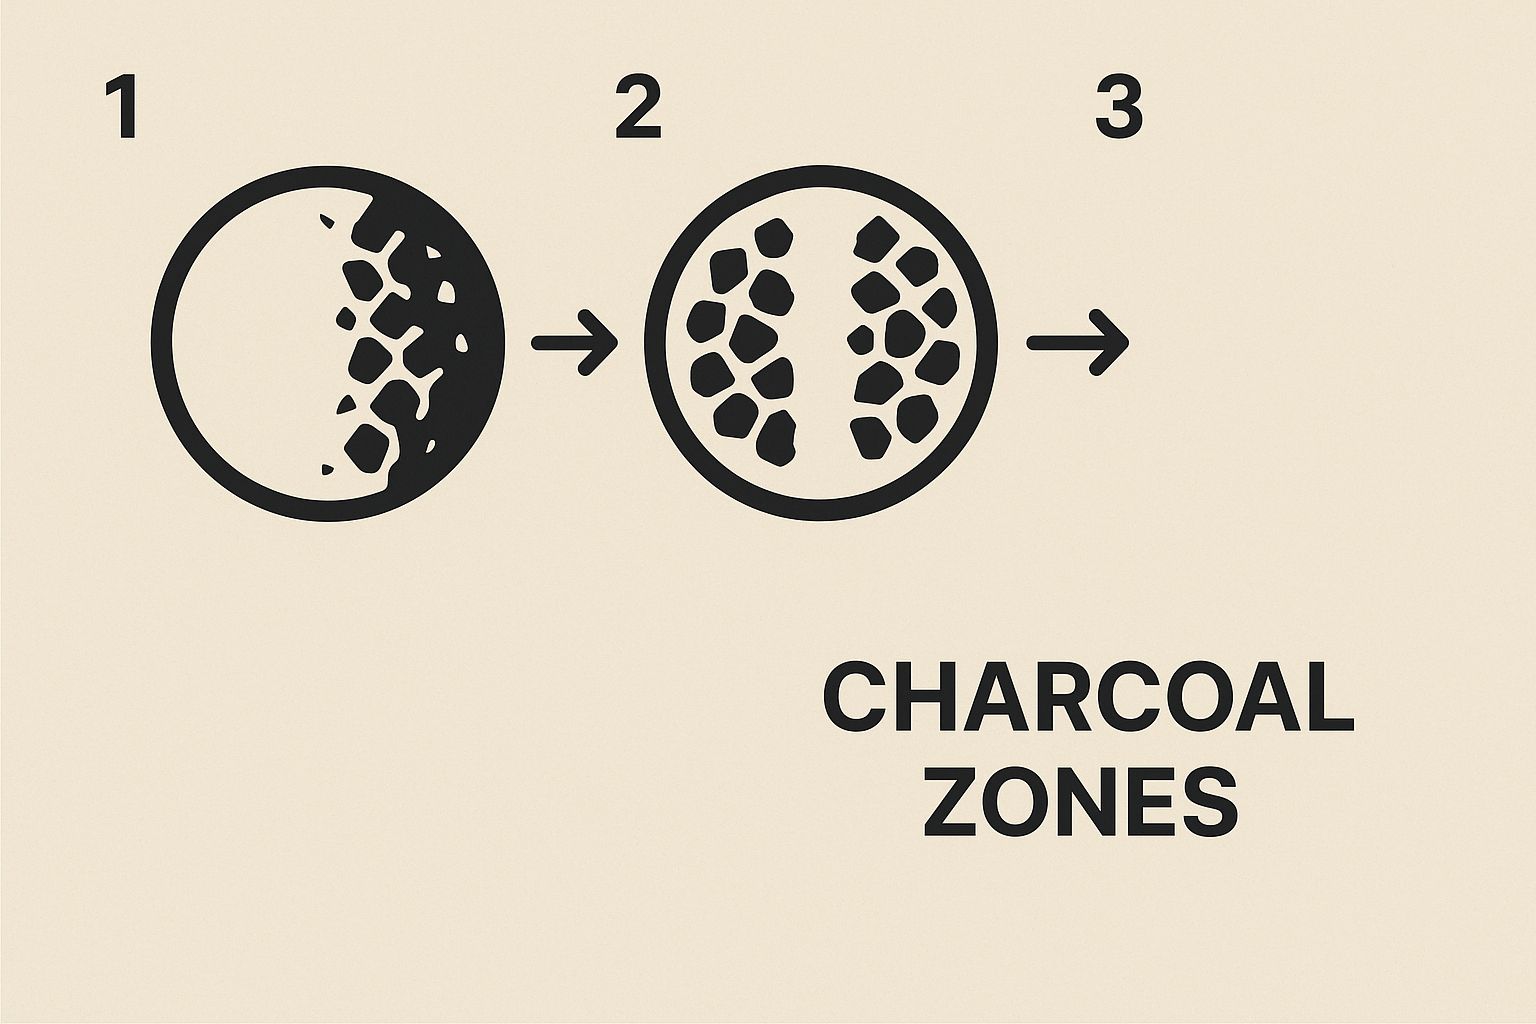
As you can see, this simple division of space is the key to managing your heat while still having a place for less intense cooking. It’s a game-changer.
The Charcoal Snake for Low and Slow Cooking
While a two-zone fire is awesome for active grilling, what about those epic, all-day cooks? For things like ribs, brisket, or a pork shoulder, you need steady, low heat for hours. Constantly adding new charcoal is a recipe for wild temperature swings.
This is where the "charcoal snake" method, sometimes called a fuse, comes in.
This brilliant arrangement provides a slow, controlled burn that can hold a consistent temperature for 8-12 hours without you having to mess with it. It works by creating a long, C-shaped chain of unlit briquettes around the edge of your grill. You then place just a handful of lit coals at one end, which slowly ignite the next briquettes in the line.
By laying out your charcoal in a specific pattern, you're not just building a fire—you're programming its behavior. The snake method turns your standard kettle grill into a remarkably effective smoker, proving that technique is just as important as the equipment itself.
To build one, just follow these simple steps:
- Create a chain of unlit briquettes, two-by-two, around the outer edge of the charcoal grate. Make the chain about two-thirds of the way around.
- If you're smoking, place a few wood chunks on top of the briquettes near the beginning of the snake.
- Light about 8-10 briquettes in a chimney starter until they're fully ashed over.
- Carefully place the lit briquettes at one end of the snake. They'll act as the "fuse," slowly igniting the rest of the chain over many hours.
This method is the ultimate "set it and forget it" technique for charcoal grilling. It’s how you get that tender, melt-in-your-mouth brisket on a standard grill. By controlling how the fire spreads, you control the heat, ensuring your grill stays hot—but not too hot—for the entire cook.
Mastering Airflow to Control Your Fire
If your charcoal arrangement is the engine, then your grill's vents are the gas pedal and the brakes. Simple as that. They give you direct, real-time control over the fire by managing the one thing it craves most: oxygen. Once you get the hang of this relationship, you can dial in any temperature you want.
Think of your fire as a living, breathing thing. The bottom vents are its lungs, pulling in fresh, cool oxygen to feed the coals. The top vent is the exhaust, drawing hot air and smoke up and out. This creates a chimney effect that pulls even more oxygen in through the bottom. It’s a beautiful, self-sustaining system.
The Basic Rules of Vent Management
The core principle is dead simple: more air equals a hotter fire. Less air cools things down.
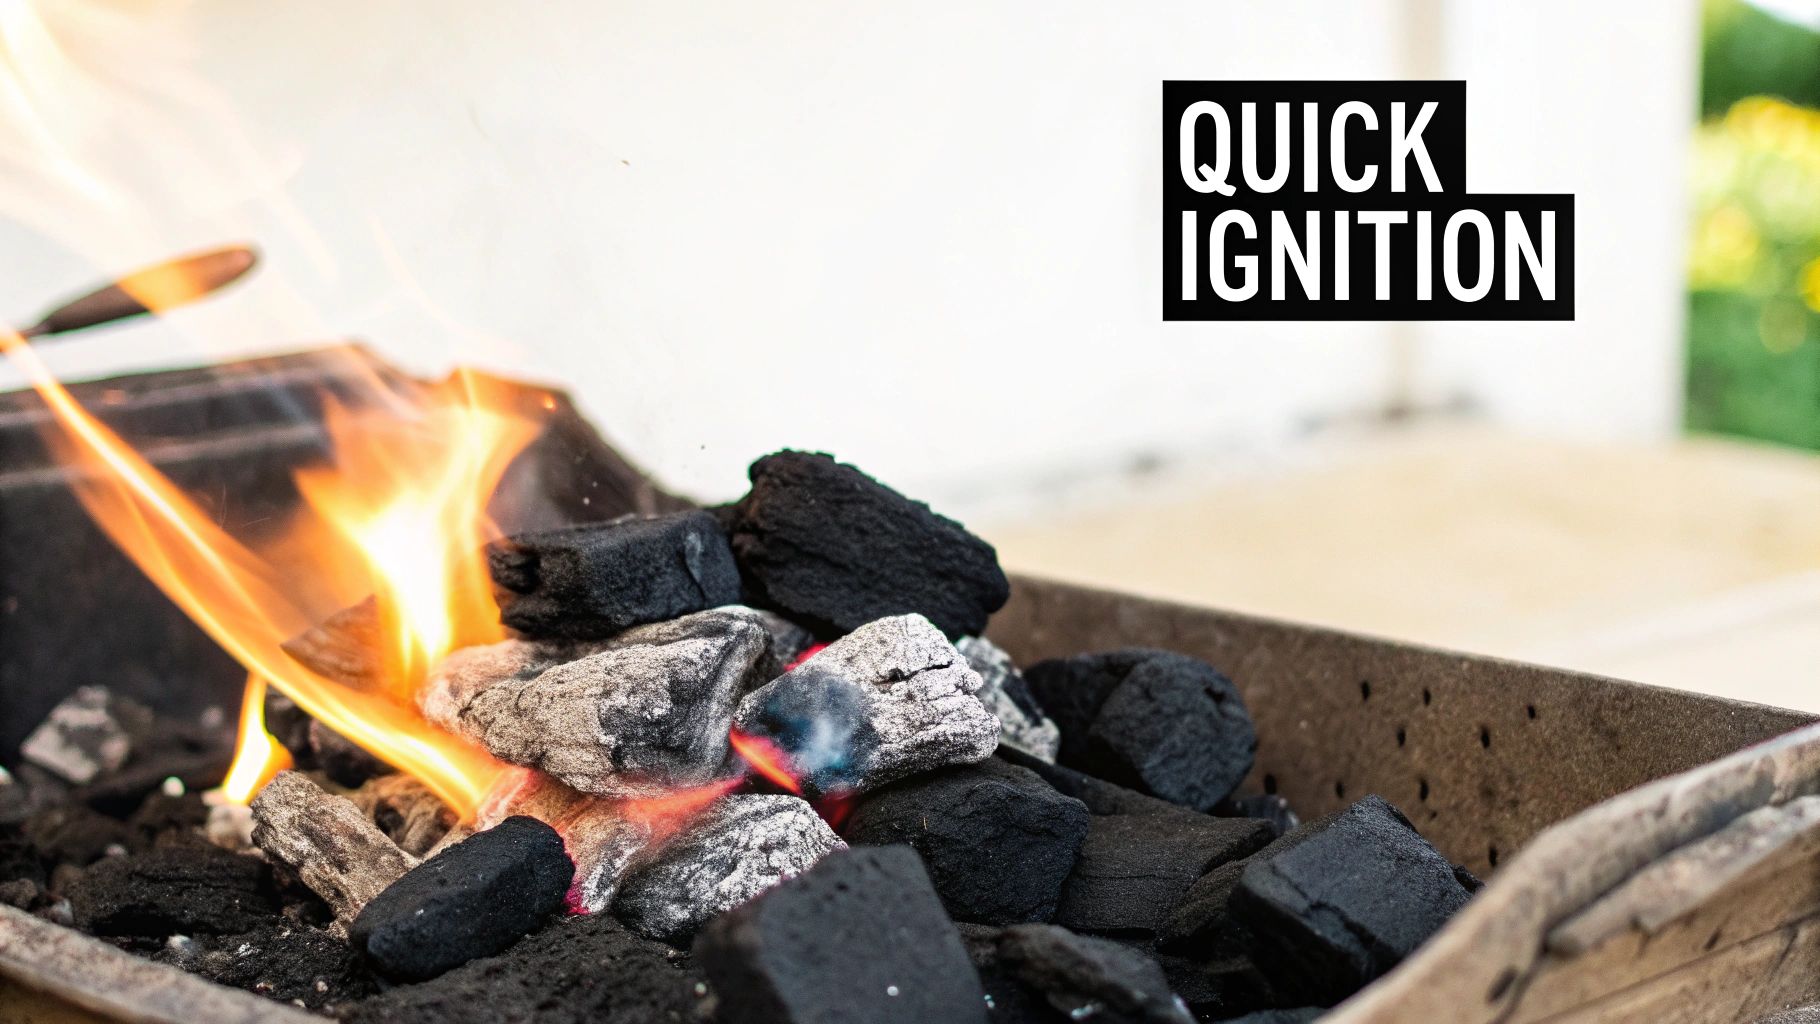
When you're first lighting up a chimney of charcoal, you want both the top and bottom vents wide open. You're trying to get as much oxygen to those coals as possible to help them get screaming hot, fast.
Once the grill is up to temp, that's when you start making adjustments. Here’s where a lot of people go wrong. The bottom vent is your primary control for the grill's overall heat. The top vent is for making small, fine-tuning adjustments. Closing that bottom vent halfway will choke the oxygen supply in a big way, causing the temperature to drop steadily.
A classic rookie mistake is only messing with the top vent. Sure, it has an effect, but the bottom vent is your powerhouse. Always set your general temperature range with the bottom vents, then use the top vent for smaller tweaks.
This dynamic control is what separates the pros from the amateurs, especially when things don't go according to plan. Let's say you throw a big, cold brisket on the grates. The internal temperature of your grill is going to plummet. Your first instinct might be to dump more charcoal in, but hold on. The real solution is often just to open the vents wider for a few minutes. Give the fire a shot of oxygen, and it’ll roar back to life.
Putting Airflow into Practice
Let's walk through a couple of real-world scenarios where vent control is your best friend.
- Taming a Flare-Up: Fat drips, hits the hot coals, and whoosh—you've got a grease fire scorching your beautiful steak. Don't panic. The fix is to cut off the oxygen. Immediately close the lid and shut the top vent almost completely. With its air supply choked off, that flare-up will die down in seconds.
- Finding Temperature Zen: After you make a vent adjustment, walk away. Give the grill a solid 10-15 minutes to stabilize before you touch it again. Charcoal is slow to react, and if you keep fiddling with the vents every two minutes, you'll be stuck on a frustrating temperature rollercoaster all day.
But maybe the most powerful tool for maintaining heat isn't a vent at all—it's the grill lid.
Keeping that lid on is non-negotiable. It traps an incredible amount of heat, creating the stable, convective environment you need for amazing barbecue. Tests show a standard kettle grill with the lid on can easily hold temperatures of 600–650°F (316–343°C), which is perfect for searing. The moment you take that lid off, heat pours out, temperatures crash, and your fire goes haywire.
If you want to dive deeper into the science behind this, ThermoWorks has a great article on charcoal grilling temperatures. By mastering your vents and, most importantly, keeping that lid closed, you'll have complete command over your fire.
How to Refuel Without Losing Temperature
Every long cook, whether it's a pork shoulder or a brisket, eventually hits that critical moment: you need more fuel. This is the exact point where a great grilling session often takes a nosedive. So many people make the classic mistake of dumping cold, unlit charcoal right onto the dying embers, which is the fastest way I know to kill your fire.
This move literally smothers the existing coals, forcing the grill to waste a massive amount of energy just to ignite the new fuel. What you get is a dramatic temperature drop that can easily add hours to your cook time and completely throw off the consistency of your results. Knowing how to refuel the right way is a core skill for keeping that grill hot and steady.
The single most important rule is this: always light new charcoal in a chimney starter before adding it to the grill. By pre-lighting the fuel, you're adding fully ignited, heat-pumping coals, not a pile of cold briquettes that act like a fire extinguisher.
The Proactive Refueling Method
On a long cook, anticipation is your best friend. You absolutely cannot wait until your grill's temperature starts crashing to think about adding more fuel. A proactive approach is the real secret to keeping a charcoal grill hot for hours on end.
You'll want to get a fresh batch of charcoal going in your chimney starter about 20-30 minutes before you even think you'll need it. I keep a close eye on two key things:
- The Thermometer: Once my grill's temperature dips about 25°F below my target, that's my cue to get the chimney started.
- The Coals: A quick peek (and I mean fast) at the charcoal bed tells you everything. If the coals are visibly shrinking and turning into a bed of white ash, your fuel is on its last legs.
By getting the new charcoal started ahead of time, it will be perfectly ashed-over and roaring hot the moment your grill needs that boost. If you're looking for clever ways to get a chimney lit, especially without traditional starters, our guide covers several methods on how to start a grill without lighter fluid.
Adding New Coals Correctly
Once your new coals are glowing red and have that light coating of white ash, it’s go-time. The goal here is speed and precision to keep heat loss to an absolute minimum.
The secret to a seamless refuel is treating it like a quick, surgical procedure. Have your tools ready, your new coals hot, and your plan in mind. The less time that lid is open, the more stable your temperature will remain.
First, grab a pair of long-handled tongs and carefully push the old, dying embers over to one side, banking them together. This clears out a perfect landing zone for the fresh fuel.
Next, carefully pour the hot, lit coals from your chimney starter into that empty space. The key is to avoid just dumping them on top of the old coals, which can create a dense pile that chokes off airflow. You want to place them right next to the existing embers.
Finally, get that lid closed immediately and double-check that your vents are still set where you want them. Your grill’s temp might dip for a minute from having the lid open, but because you've added a potent new heat source, it will recover quickly and climb right back to your target. This is the method that ensures a smooth, steady cook every single time.
Leveling Up: Why Your Restaurant Needs a Commercial Charbroiler
In a professional kitchen, knowing how to keep a charcoal grill hot isn't just a backyard skill—it's a core part of your business. That searing heat has to be powerful and, most importantly, consistent for every single service. This is exactly where the gear you use at home just can't keep up.
While the basic idea of managing heat is the same, a commercial kitchen is a whole different ballgame. You're dealing with a relentless pace and zero room for error. That's why we build commercial charbroilers to deliver that rock-solid performance, night after night. Each model is engineered to solve a specific problem, whether it's space, menu diversity, or local regulations.
Matching the Right Charbroiler to Your Menu
For the steakhouse that lives and dies by the quality of its crust, our infrared charbroilers are absolute game-changers. They crank out an incredible amount of direct heat that sears the surface instantly, locking in every bit of juice.
If your kitchen is juggling a wide-ranging menu during a chaotic dinner rush, our gas charbroilers are the trusted workhorses. They give you the precise temperature control you need to nail everything from delicate fish to thick-cut chops without breaking a sweat.
And for kitchens with open-flame restrictions? Our high-efficiency electric charbroilers deliver steady, safe heat without ever compromising on those beautiful grill marks. Getting the right tool for the job is the first step to making sure every plate that goes out is something you're proud of.
The jump from a backyard grill to a commercial charbroiler isn’t just about getting bigger—it's about buying consistency. Your equipment has to be a reliable partner that can produce the exact same, perfect result under pressure, for every single order.
While our main game is heavy-duty cooking equipment, we know that a restaurant's success depends on more than just the charbroiler itself. You need dependable utilities to power it all. For kitchens where operational uptime is everything, looking into options like emergency natural gas solutions for commercial heat can be a smart move for your business continuity plan.
Ready to find the perfect unit for your kitchen? Dive into our detailed guide on selecting the best commercial charbroiler.
Troubleshooting Common Grill Heat Problems
Even seasoned pros run into a fire that just won't behave. We’ve all been there. If your grill is struggling to climb to temperature, the problem almost always boils down to the basics. Nine times out of ten, the culprit is either damp charcoal that just wants to smolder, not burn, or a bed of old ash that’s choking your bottom vents and starving the fire of precious oxygen.
Before you even think about lighting a single briquette, get in the habit of making sure your grill is completely clean and your charcoal is bone dry. This little bit of prep work solves the vast majority of heat-up headaches. A fire needs two things: fuel and air. Skipping this step kneecaps both from the get-go.
Fire Burning Too Hot or Dying Out
So what about the other side of the coin? What if your fire is a raging inferno you can't seem to tame? That’s purely an airflow problem. If your grill is roaring like a jet engine, you’re feeding it way too much oxygen.
Start by partially closing the top exhaust vent. This traps more heat inside and, more importantly, slows down the chimney effect that’s pulling air through the grill. If the temperature doesn't start to creep down, you can then slightly close the bottom intake vent as well.
Conversely, a fire that keeps sputtering out mid-cook is a fire that's suffocating. Check that your vents aren't clogged with ash and make sure they’re open enough to give those coals a steady supply of air to breathe.
Precise temperature control is what separates the backyard heroes from everyone else, and it's a key reason the US barbecue market was recently valued at around $2.75 billion. Nailing a stable grilling temperature—whether it's 225°F for a low-and-slow smoke or searing temps for a steak—is all about mastering your vents and keeping that lid closed. For more tips on this, check out the great insights on temp control at Chefstemp.com.
Once you learn to diagnose these common hiccups, you can adjust on the fly and save any cookout from disaster. Every problem has a straightforward fix, and it's always tied directly to your fuel quality or airflow management.
Common Questions About Keeping Your Grill Hot
Even when you've got your technique dialed in, grilling always throws a few curveballs. When you're in the middle of a cook, you need quick answers to keep things on track. Let's tackle some of the most common questions that pop up when you're trying to master that fire.
How Often Should I Add More Charcoal?
This is one of those "it depends" questions, but there's a solid rule of thumb that'll keep you out of trouble. For longer cooks—think ribs or a pork shoulder—plan on checking your fuel level every 60 to 90 minutes.
The real trick is to be proactive, not reactive. Don't wait for your thermometer to start plummeting. The moment you see the coals look a little sparse or the heat starts to fade, it's time to get a fresh batch going in your chimney starter. Adding fully lit coals is the only way to refuel without killing your temperature.
Can I Reuse Leftover Charcoal?
Technically, yes. Should you? Probably not, especially if you're aiming for consistent, high heat. Charcoal that's been partially burned and extinguished is a magnet for moisture from the air. That makes it a real pain to light and an unreliable fuel source.
It just won't burn as hot or as evenly as fresh charcoal. You'll be fighting an uphill battle from the start.
For the most dependable fire, always start with a fresh, dry batch of charcoal. It’s a simple step, but it eliminates one of the biggest variables standing between you and a perfectly cooked meal.
How Do Wind and Cold Weather Affect My Grill?
Weather is a huge factor, and ignoring it is a classic rookie mistake. Wind, for instance, acts like a giant bellows. It can whip your fire into a frenzy, making it burn way hotter and tear through your charcoal much faster than you'd expect.
Cold air does the exact opposite. It's a heat thief, constantly pulling warmth away from the grill. This forces your fire to work overtime, burning through more fuel just to hold a steady temperature. If you're grilling on a chilly or blustery day, find a sheltered spot if you can and definitely have extra charcoal ready to go. You'll be refueling more often than you would on a calm, sunny afternoon.