

How to Grill Chicken on Charcoal Grill Perfectly | Easy Guide
Learning how to grill chicken on a charcoal grill is simpler than you might think. It really just boils down to two things: controlling your fire and using the right technique. Once you master a two-zone fire for both direct searing and indirect cooking, you'll be able to lock in that incredible smoky flavor, get perfectly crispy skin, and serve up juicy chicken every single time.
Why Charcoal Grilling Just Tastes Better
There’s a special kind of magic that happens when chicken meets hot charcoal. Unlike a gas grill, which mostly just throws hot air at your food, a charcoal fire cooks with a powerful combination of direct radiant heat and natural wood smoke. This one-two punch is what creates that deeply satisfying, smoky crust that’s impossible to get any other way.
But the flavor isn't just from the smoke—it's a whole chemical reaction happening right on your grill. As the chicken’s natural juices and rendered fat drip down onto the hot coals, they instantly vaporize. That flavorful steam rises back up and coats the meat, continuously basting the chicken in its own essence. This cycle builds incredible layers of complex, savory flavor you just can't replicate with a gas flame.
The Foundation of Flavor: Your Choice of Fuel
The type of charcoal you use makes a huge difference in the final taste of your chicken. You’ve really got two main options on the shelf:
- Lump Charcoal: This is the pure stuff, made from nothing but carbonized wood. It burns hotter and faster, which means you get a much more intense and authentic wood-smoke flavor. It's my go-to when I want a really strong, smoky profile on something like chicken wings or thighs.
- Charcoal Briquettes: These are manufactured from wood byproducts and other additives, and they're engineered to burn more uniformly and for a longer time. They give off a milder smoke flavor and are fantastic for maintaining a consistent temperature during longer cooks, like when you're grilling a whole bird.
And this preference for authentic grilled taste isn't just a backyard thing; it's a global phenomenon. In 2023, the worldwide market for BBQ charcoal was valued at approximately US$ 3.25 billion and is only expected to grow. People everywhere are chasing that unique flavor that only real charcoal can deliver.
For restaurant professionals, capturing that authentic charcoal flavor consistently is everything. While backyard grilling is a craft, a commercial kitchen demands precision, durability, and the ability to repeat results flawlessly, night after night.
In a professional setting, getting that perfect char at scale is essential. A kettle grill is great for home, but restaurants rely on specialized equipment. For anyone in the foodservice industry, the next logical step is exploring our wide selection of commercial charbroilers. We offer powerful infrared, precise gas, and efficient electric char broilers to meet any restaurant's needs. Understanding what a charbroiler is can show you how these machines are designed from the ground up to deliver consistent, high-quality results for any restaurant menu.
For a quick reference, here's a little cheat sheet I put together to help you nail the key steps every time you fire up the grill.
Quick Guide to Grilling Chicken on Charcoal
| Phase | Critical Action | Target / Goal |
|---|---|---|
| Fire Setup | Create a two-zone fire (hot and cool sides) | Hot zone: 450-550°F for searing. Cool zone: 300-350°F for indirect cooking. |
| Chicken Prep | Pat chicken completely dry and season generously | Dry skin is essential for a crispy finish. Seasoning adheres better. |
| Initial Sear | Sear chicken skin-side down over direct heat | 2-4 minutes per side until golden brown with good grill marks. |
| Indirect Cooking | Move chicken to the cool side of the grill and close the lid | Cook until internal temp reaches 160-165°F, avoiding flare-ups. |
| Resting | Remove from grill and let it rest on a cutting board | 5-10 minutes before slicing to allow juices to redistribute. |
Following these key temperature and time targets will get you incredibly close to restaurant-quality results right in your own backyard. It’s all about managing the heat and trusting the process.
Choosing and Prepping Your Chicken for the Grill
The secret to truly incredible grilled chicken starts long before you even think about lighting the charcoal. It all begins at the butcher counter. Picking the right cut and prepping it properly is what separates good-enough chicken from the kind people talk about for weeks.
Think about it: chicken breasts are lean and cook fast, but they have a nasty habit of drying out if you look away for a second. Bone-in thighs or leg quarters, on the other hand, are loaded with more fat and connective tissue. This makes them incredibly forgiving on the grill, staying juicy and tender even if your timing is a little off.
The Best Cuts for a Charcoal Grill
Not all chicken is created equal, especially when you’re talking about the intense, direct heat of a charcoal fire. Here’s a quick rundown of what I always reach for:
- Bone-in, Skin-on Thighs: This is the undisputed hero of charcoal grilling. The bone acts as a heat buffer, helping the meat cook evenly, while the skin gets beautifully crisp and protects everything underneath, keeping it ridiculously moist.
- Drumsticks: A family favorite for good reason. Drumsticks are easy on the wallet and even easier to cook. Their smaller size means they cook through relatively quickly while staying tender.
- Chicken Wings: Wings are practically made to soak up smoky flavor. They’re perfect for grilling over direct heat, and that high skin-to-meat ratio gives you that addictive, crispy texture everyone loves.
- Boneless, Skinless Breasts: Okay, these are less forgiving, but they can be fantastic if you prep them right. Pounding them to an even thickness and using a brine or marinade isn't just a suggestion—it's non-negotiable for success.
It's no surprise we're so focused on chicken; it has become the most consumed meat in the United States and is a top contender globally. In the U.S. alone, over 8 billion broiler chickens are raised for meat each year, making it the king of the backyard grill. You can dig deeper into global meat consumption trends from reports by Steakholder Foods.
Prepping for Perfect Results
Once you've got your chicken, a couple of simple prep steps will make a world of difference. First things first: pat the chicken completely dry with paper towels. Moisture is the enemy of crispy skin. It just creates steam, which is the exact opposite of the beautiful browning and rendering you want.
Next up is the brine or marinade. This isn't just about adding flavor; it's a bit of kitchen science that guarantees juicy meat. A simple brine—just salt and water—uses osmosis to pull moisture into the chicken. This creates a buffer that protects the meat from the grill’s intense heat.
A brine is your insurance policy against dry chicken. Even 30 minutes in a simple saltwater solution can make a huge difference in the final texture, especially for lean cuts like chicken breasts.
A marinade does a similar job but also brings flavor to the party with acids (like citrus or vinegar) and aromatics. These ingredients don't just add taste; they also help tenderize the meat. For the best results, let your chicken marinate for at least two hours before it hits the grill. Nail this foundational step, and you're well on your way to learning how to grill chicken on a charcoal grill like you've been doing it for years.
Mastering Your Grill Setup and Heat Control

Anyone can get lucky once in a while, but consistent, incredible results on a charcoal grill come down to one thing: controlling the fire. This is where most people trip up, but learning to manage your heat is the single most important skill for grilling phenomenal chicken.
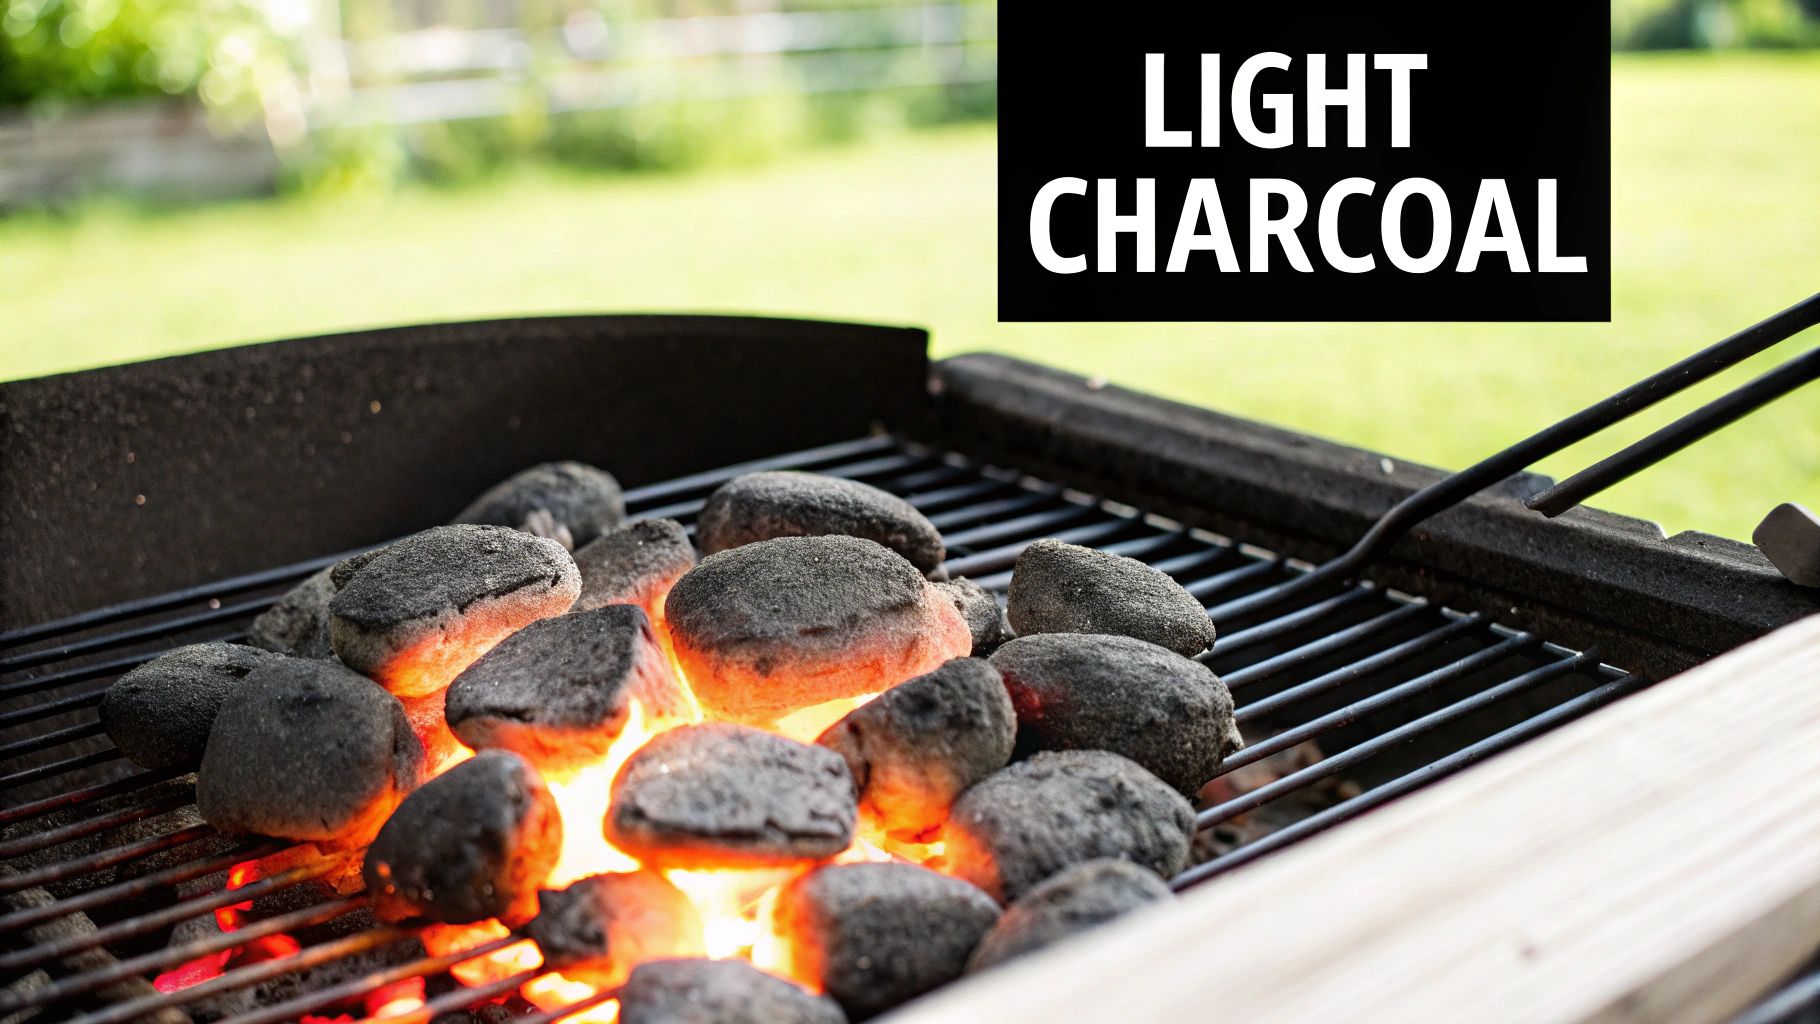
First things first, let's talk about lighting those coals. If you're still dousing your briquettes in lighter fluid, it’s time for an intervention. That chemical taste clings to everything and can completely ruin the delicate flavor of chicken. Your best friend here is a charcoal chimney starter. It's just a simple metal cylinder that uses newspaper and airflow to get your coals roaring hot, clean, and fast.
Just crumple a couple of sheets of newspaper into the bottom, fill the top with charcoal, and light the paper. In about 15-20 minutes, you'll see the top coals covered in a light grey ash—that's the signal that they're ready to go. No chemical aftertaste, ever.
The Power of a Two-Zone Fire
The real secret to perfectly cooked chicken—crispy skin on the outside, juicy meat on the inside, and absolutely no burning—is the two-zone fire. This technique is a game-changer because it creates two distinct cooking areas on your grill: a high-heat direct zone and a cooler indirect zone.
Here's how you build it:
- Dump the Coals: Once your coals are glowing hot, carefully pour them all onto one side of the grill's charcoal grate.
- Create Your Zones: Bank the coals so they cover about half of the grate, leaving the other half completely empty.
- Replace the Grate: Put your main cooking grate back in place. The side directly over the coals is now your hot zone for searing. The empty side is your cool zone for gentle, even cooking.
This setup is your safety net. If you get a flare-up over the hot side (and you will), you can just slide the chicken over to the cool side until the flames die down. This method is the foundation for mastering how to grill chicken on a charcoal grill without the usual stress.
Before you choose your fuel, it helps to understand what you're working with. Both lump charcoal and briquettes will get the job done, but they behave very differently.
Lump Charcoal vs Briquettes for Grilling Chicken
A practical comparison to help you choose the right fuel for your grilling style and needs.
| Attribute | Lump Charcoal | Charcoal Briquettes |
|---|---|---|
| Heat Output | Burns hotter and faster | Burns cooler and more consistently |
| Burn Time | Shorter burn time | Longer, more predictable burn time |
| Ash Production | Produces very little ash | Creates a significant amount of ash |
| Additives | 100% natural hardwood | May contain binders and additives |
| Best For | High-heat searing, quick cooks | Low-and-slow cooking, long grilling sessions |
| Cost | Generally more expensive | More budget-friendly |
For chicken, briquettes often have an edge because their steady, moderate heat is more forgiving. However, many pros swear by lump for its pure, smoky flavor. My advice? Try both and see which one fits your style.
Dialing in the Perfect Temperature
Think of your grill's vents as the gas pedal and brake for your fire. They control the flow of oxygen—more oxygen means a hotter fire, less oxygen means a cooler one.
- The Bottom Vent: This is your main air intake. You'll want it wide open when lighting the coals and preheating. To hold a steady temperature around 350-450°F (177-232°C), you'll probably have it about halfway open.
- The Top Vent: This vent acts as the exhaust, letting heat and smoke out. It should almost always be at least partially open to keep the air flowing. Closing it down will lower the temp and trap more smoke inside.
Here's the golden rule: The bottom vent feeds the fire, and the top vent fine-tunes the temperature. Make small adjustments and give the grill a few minutes to respond before you change things again.
While this two-zone method is the gold standard for backyard grilling, commercial kitchens have to deliver this level of quality on a massive scale. For restaurant owners, getting fired up about commercial charbroilers is the next logical step. These powerful units are engineered to produce that authentic grilled flavor with the precision and volume a professional kitchen demands, ensuring every single order is perfect.
The Complete Walkthrough for Grilling Perfect Chicken
You’ve got your two-zone fire dialed in and the chicken is prepped and ready. Now for the fun part—bringing it all together. This is where your technique meets the heat to create that smoky, unforgettable flavor everyone craves.
But first, a simple but critical step that will save you a world of frustration.
Before any food hits that grill, you have to oil the grates. Once they’re scorching hot, grab some long tongs, dip a folded paper towel in a high-smoke-point oil (canola or vegetable oil works great), and give the grates a quick, careful wipe. This creates a non-stick surface, making sure that beautiful, crispy skin stays on the chicken, not welded to your grill.
Searing and Sizzling Over Direct Heat
Alright, time to put that two-zone fire to work. Start by placing your chicken pieces, skin-side down, right over the hot coals. You want to hear an immediate, satisfying sizzle—that’s the sound of success. This is the searing phase, and it’s all about building a gorgeous, golden-brown crust and those classic grill marks.
Now, hands off. Leave the chicken alone for a solid 2-4 minutes. I know it's tempting to peek, but resisting that urge lets the Maillard reaction do its thing, developing all those deep, savory flavors. Once a good crust has formed, the chicken will release easily from the grates.
Cooking Through with Indirect Heat
After you’ve seared both sides, slide the chicken over to the cooler, indirect side of the grill. I like to arrange the pieces so the thickest parts face the fire, which helps everything cook more evenly.
Now, put the lid on. Make sure the top vent is positioned directly over the chicken. This simple trick pulls all that hot, smoky air across the meat, basically turning your grill into an outdoor convection oven. This is where patience really pays off, as it lets the chicken cook through gently without incinerating the skin.
Your single most important tool from here on out is a good instant-read thermometer. Color is a terrible indicator of doneness, and every time you cut into the chicken to check, you’re letting precious juices escape. Trust the temperature, not your eyes.
This whole process of managing heat zones is a fundamental skill, whether you're grilling in the backyard or running a commercial kitchen. Chefs use these same principles of heat management to get consistent results at a much larger scale. If you're curious how the pros handle the heat, our guide on cooking on your commercial charbroiler offers some great insights.
The image below breaks down the final, crucial stages for getting that chicken perfectly cooked and juicy every single time.
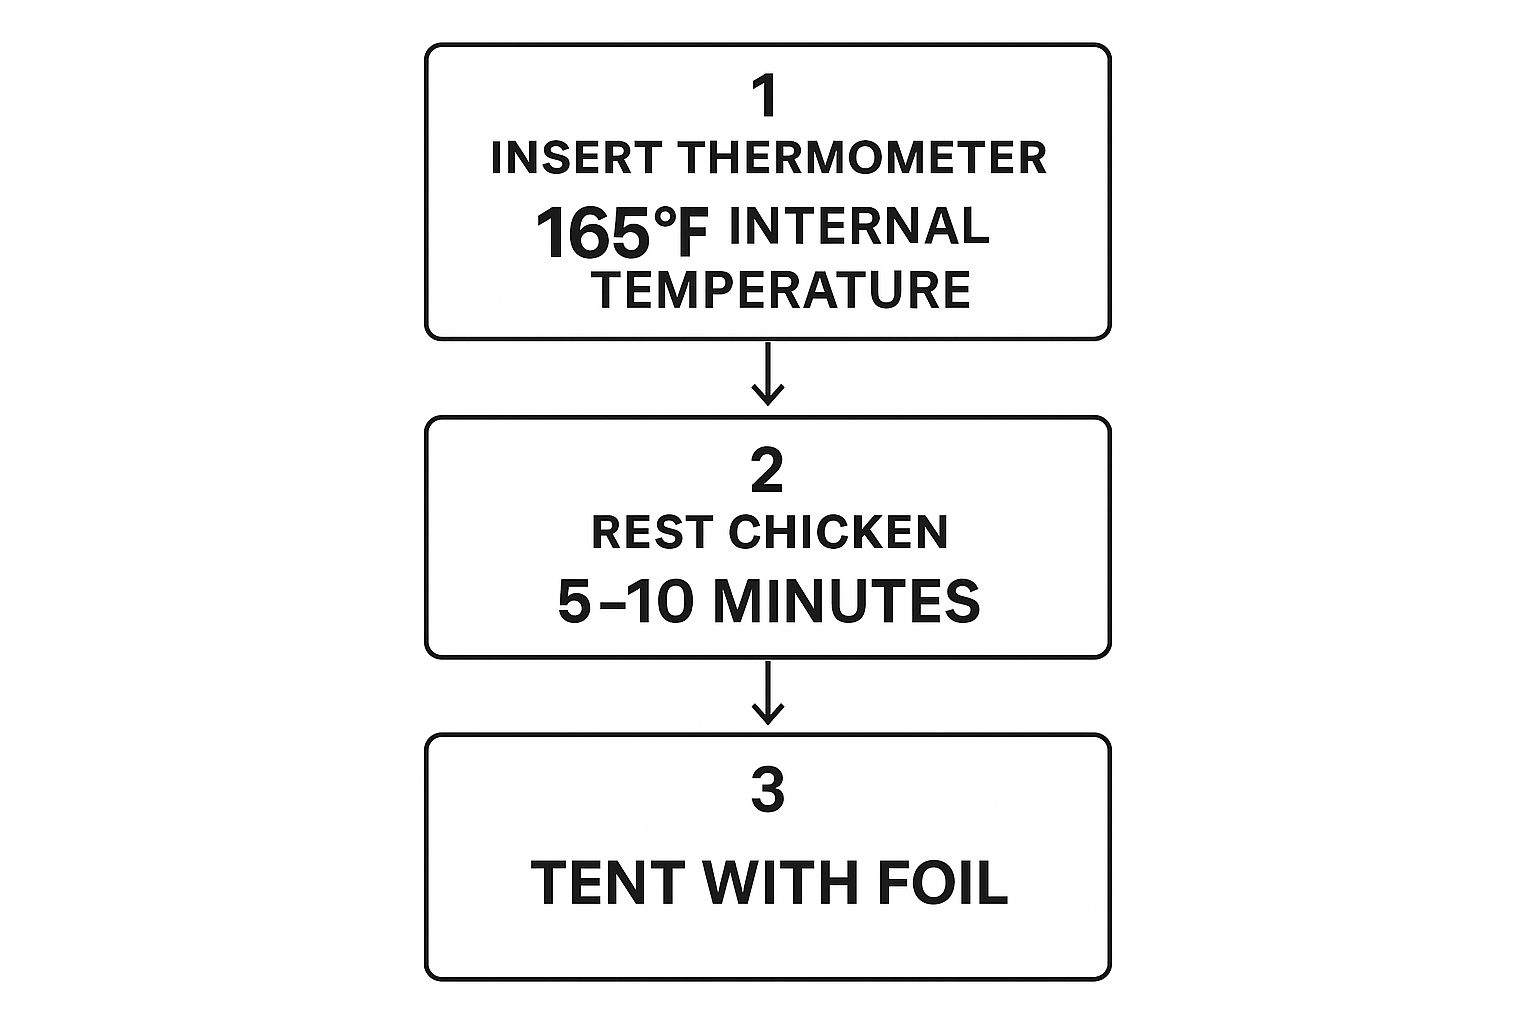
As you can see, hitting the right internal temperature and letting the chicken rest are non-negotiable. Skip these, and you’re just cheating yourself out of a great meal.
Saucing and Resting for Juicy Results
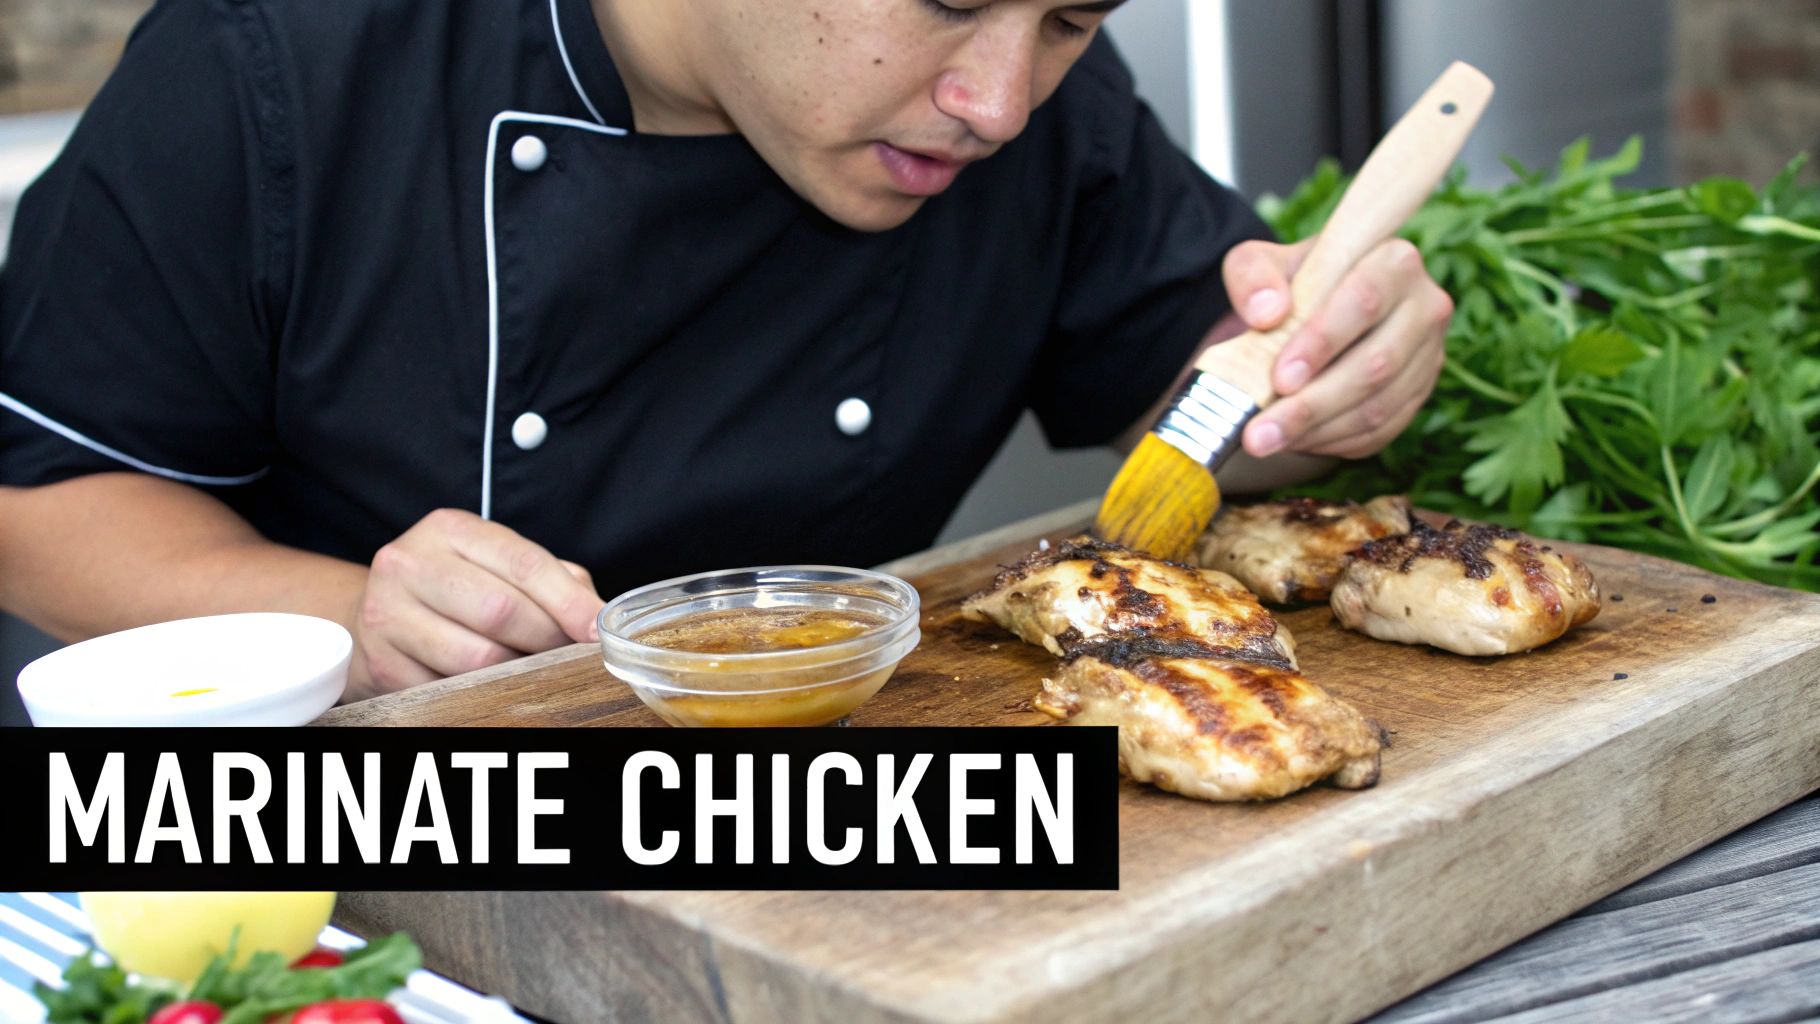
Planning on using a barbecue sauce? Hold on. If it has sugar in it—and most do—wait until the last 5-10 minutes of cooking before brushing it on. Apply it too early, and the sugar will burn over the heat, turning your masterpiece into a blackened, bitter mess. Brush it on while the chicken is on the cool side of the grill; this gives it time to thicken and caramelize without scorching.
Once your thermometer hits 165°F (74°C) in the thickest part of the meat, pull the chicken off the grill and get it onto a clean cutting board. Tent it loosely with some foil and let it rest for at least 5-10 minutes. This allows the muscle fibers to relax and reabsorb all those flavorful juices, guaranteeing every bite is moist and tender. It’s the final step that separates good grilled chicken from great grilled chicken.
Achieving Grill-Quality Results in a Commercial Kitchen
Trying to bring that authentic, smoky flavor from a charcoal grill into a busy restaurant kitchen? It's a whole different ballgame. For professional chefs, it's not just about amazing taste—it’s about nailing that taste every single time with speed and consistency. This is where the backyard art of grilling chicken transforms into a commercial science, and it demands equipment built for the grind.
Our lineup of commercial charbroilers is engineered for exactly these challenges, helping you serve up that incredible grilled flavor your customers crave. Forget the standard kettle grill; these machines deliver the raw power and pinpoint control you need to crush a busy service without breaking a sweat.
Finding the Right Commercial Charbroiler
Picking the right charbroiler really comes down to your kitchen's unique setup—its layout, volume, and what kind of power you have access to. Each type brings something different to the table when it comes to grilling restaurant-quality chicken.
- Infrared Charbroilers: These are the speed demons. They use intense radiant heat to cook food faster and more evenly. One of the biggest wins here is the huge reduction in flare-ups, which means less accidental charring and more perfectly cooked chicken.
- Gas Charbroilers: A true kitchen staple, gas units give you amazing temperature control and versatility. They heat up in a flash and let chefs make tiny adjustments on the fly, which is a lifesaver during a chaotic dinner rush.
- Electric Char Broilers: If you're in a spot where gas lines are a no-go or you have ventilation constraints, electric charbroilers are a killer alternative. They provide steady, even heat without the headaches of a gas installation.
Of course, aiming for top-tier results in a professional kitchen means keeping things spotless. For a deeper dive into maintaining a clean and safe environment, check out these resources on pest control for restaurants.
Key Features for Professional Performance
Looking past the fuel type, a few key features make all the difference in how your charbroiler performs and how your chicken turns out. You absolutely have to pay attention to the BTU output (British Thermal Units). A higher BTU rating means more muscle—faster heating and quicker recovery times between orders. For any busy restaurant, that's non-negotiable.
The grill grates themselves are just as important. Think about it: they're what makes contact with the food. Heavy-duty cast iron grates, for instance, are brilliant at holding heat and creating those deep, beautiful sear marks that just scream "perfectly grilled."
When you choose a commercial charbroiler with the right power and features, you're not just buying equipment. You're investing in your kitchen's ability to consistently turn out the kind of smoky, perfectly grilled chicken that makes your menu stand out. It’s all about taking what makes charcoal grilling great and scaling it up for professional success.
Common Questions About Grilling Chicken on Charcoal
Even with the best game plan, things can get a little unpredictable when you're cooking over a live fire. It's just the nature of the beast. Getting ahead of the most common hiccups is what separates a decent cookout from a truly great one. Let's walk through some of the challenges I see people run into all the time.
The biggest frustration? Chicken sticking to the grates. We've all been there, watching a perfectly seasoned chicken skin tear away and get left behind. The fix is a simple three-part mantra: start with clean grates, preheat the grill properly, and oil the hot grates just before the chicken lands. Be patient, too—the chicken will tell you when it's ready to flip by releasing on its own once it gets a good sear.
Temperature and Flare-Up Management
Another big question mark is always internal temperature. For food safety, the magic number for all chicken is 165°F (74°C). No exceptions. But here's a pro tip: for dark meat like thighs and legs, push it a little further. I like to take them to 175°F or even 185°F (79-85°C). This extra heat breaks down more of that tough connective tissue, making the meat incredibly tender and juicy. An instant-read thermometer isn't optional; it's your most important tool.
Then there are the flare-ups, those sudden bursts of flame that can turn your chicken into a charred mess in seconds. They're usually caused by fat dripping onto the hot coals. Your best defense is that two-zone fire we talked about. If a flare-up erupts, just calmly slide the chicken over to the cooler, indirect side until the flames settle down. Trimming off any excessive, dangly bits of fat and skin before you grill also helps a ton.
As a rule of thumb, one full chimney starter—that’s about 80-100 briquettes—will give you enough heat to grill for about an hour on a standard 22-inch kettle grill.
These tips are perfect for a weekend cookout, but what if you're a restaurant owner trying to serve hundreds of perfectly grilled chicken dishes every night? That's a whole different ballgame. You can't afford inconsistency or inefficiency. That's when you move from backyard gear to professional-grade equipment.
For restaurant owners and chefs, we offer a wide selection of commercial charbroilers built to deliver that authentic grilled flavor with the precision and reliability a commercial kitchen demands. Our collection is designed to solve these common grilling problems before they start:
- Infrared Charbroilers: These are the ultimate for even heat. They drastically cut down on flare-ups, ensuring every piece of chicken is cooked perfectly, shift after shift.
- Gas Charbroilers: Need heat and you need it now? Gas models offer instant heat and incredibly precise temperature control, which is essential for a fast-paced kitchen.
- Electric Char Broilers: Don't have a gas line? No problem. Electric units provide consistent, high-quality results and are a fantastic solution for many establishments.
Each of our models is built like a tank to handle the non-stop grind of a professional kitchen. By choosing the right unit, you can solve these grilling challenges at scale and make sure every single dish that leaves your kitchen meets the high standard your customers expect.
At Charbroilers, we specialize in high-performance cooking equipment that brings professional-grade results to your kitchen. Explore our full range of commercial charbroilers and find the perfect solution for your restaurant at https://charbroilers.com.