
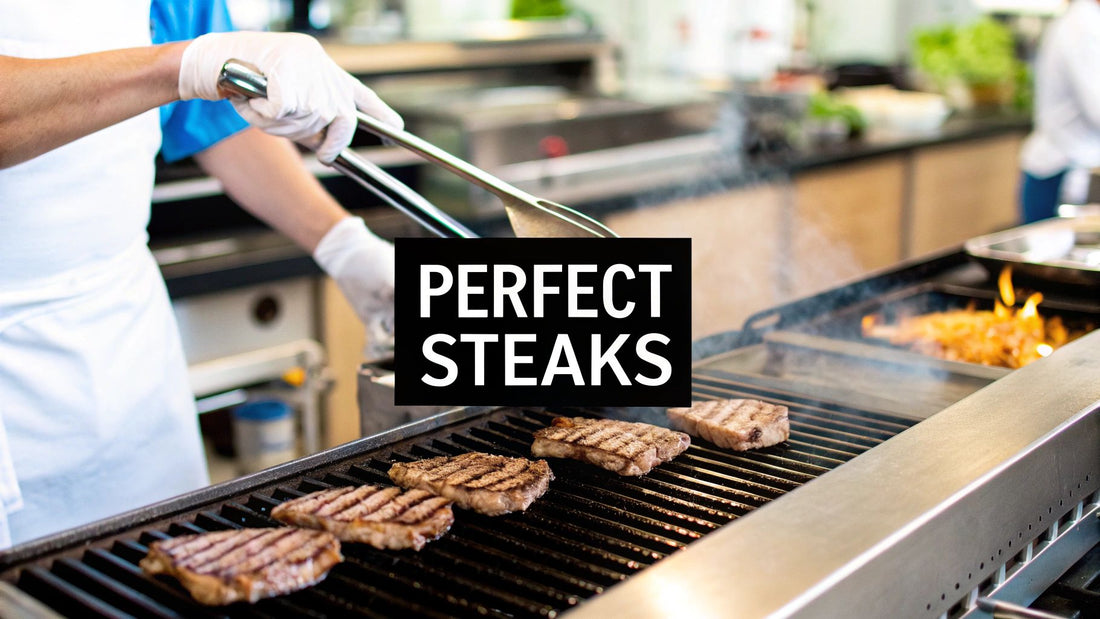
How to Grill Perfect Steaks: An SEO & Content Guide for Equipment Suppliers
Long before a steak ever hits the charbroiler, the decisions you make at the butcher block—and how you market your grilling content—set the stage for success. Grilling a truly perfect steak isn’t just about heat and timing; it's about starting with a superior cut, prepping it with intention, and supporting it with powerful content strategy. Master these fundamentals, and you're already halfway to serving a steak your customers will remember, while also boosting your online presence.
Your Guide to Selecting the Perfect Steak
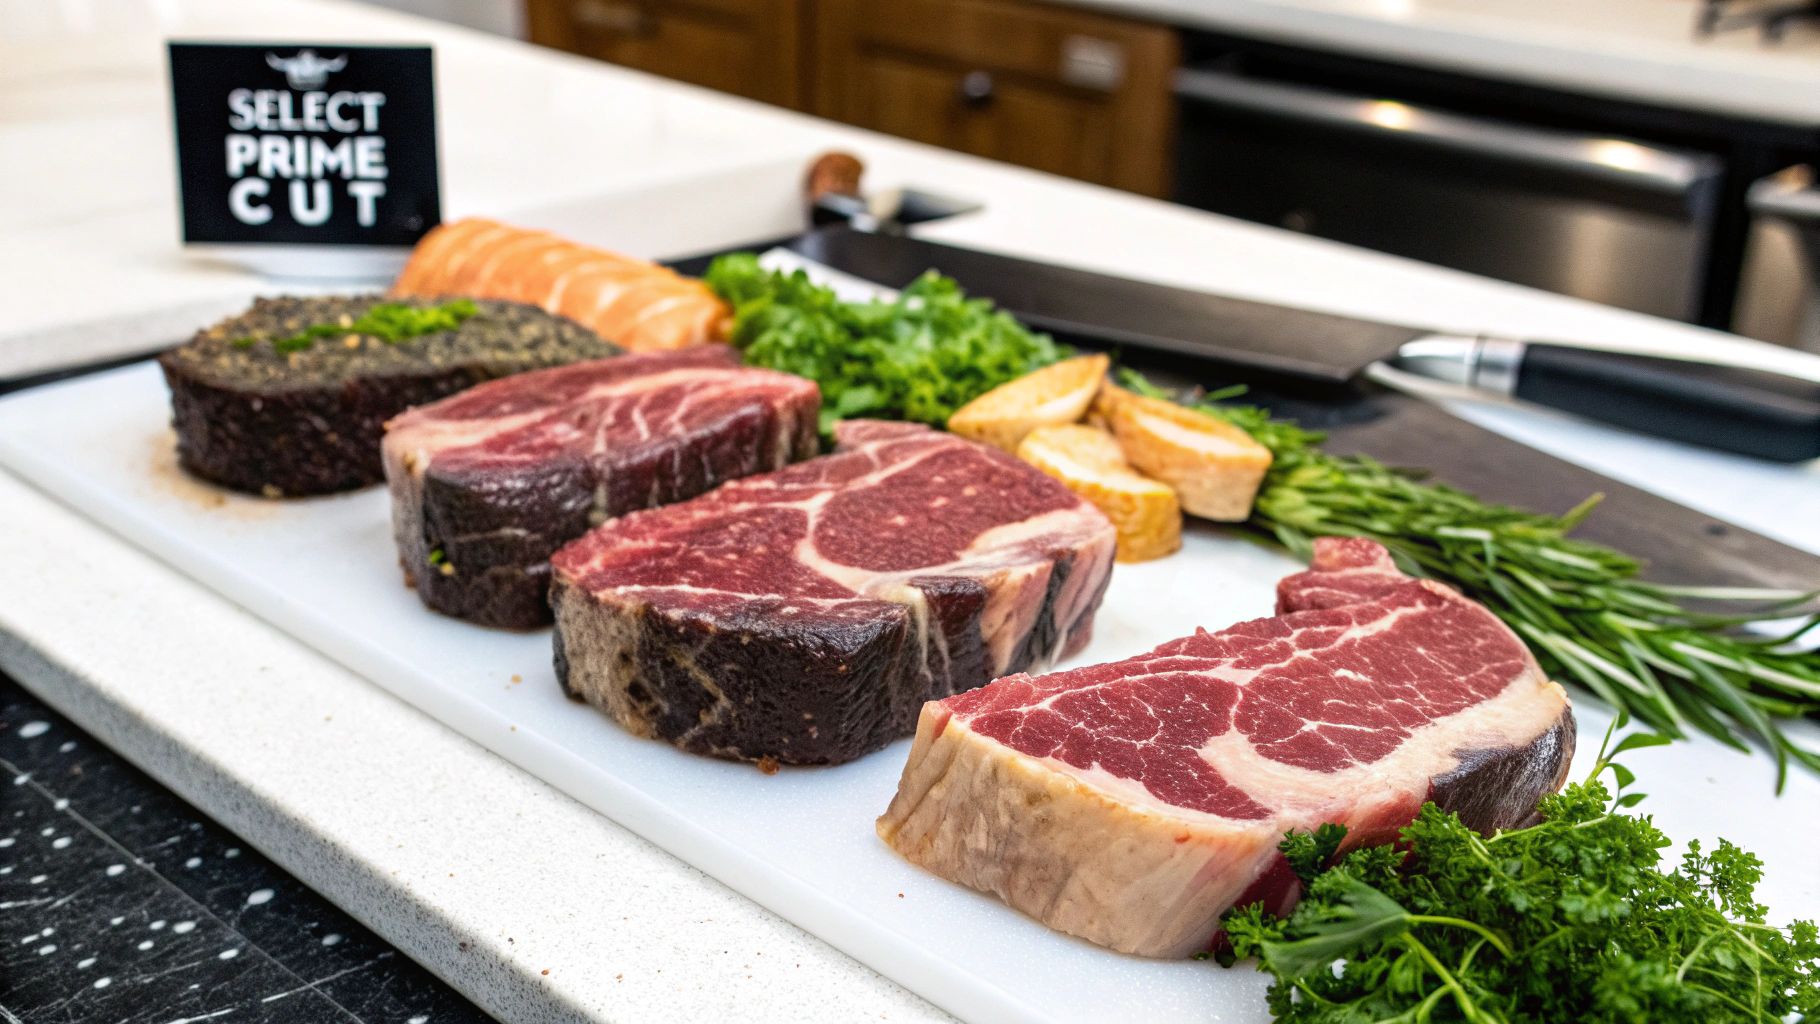
In a commercial kitchen, consistency is king. The quality of your raw ingredients is the single biggest factor in the final product. For restaurant equipment suppliers, providing expert article writing and blog posting that explains the nuances of beef grades and cuts is a non-negotiable skill for building authority with your chef clientele.
The magic is in the marbling—that beautiful, intricate web of intramuscular fat. As it cooks, that fat melts and bastes the meat from the inside out, creating the rich flavor and melt-in-your-mouth texture that defines a great steak. This is where USDA grades become your best friend.
Decoding USDA Grades for Flavor
While you’ll see plenty of labels out there, the USDA's grading system is the most reliable roadmap to quality. For a restaurant environment, you really want to stick to the top two tiers to deliver a premium experience every single time.
- USDA Prime: This is the best of the best, representing the top 2-3% of all beef produced in the country. It has the most abundant marbling, which guarantees exceptional tenderness, juiciness, and a rich, buttery flavor. Prime is the gold standard for high-end steakhouses for a reason.
- USDA Choice: This is a fantastic and much more accessible option. Choice grade beef still delivers significant marbling and great flavor, making it a versatile workhorse that perfectly balances quality with cost-effectiveness. It's a smart pick for a wide range of menus.
- USDA Select: This grade is significantly leaner and has minimal marbling. While it's easier on the budget, it just doesn't have the built-in flavor and tenderness of Prime and Choice. Without careful cooking, it can easily become tough and dry on a grill.
Bottom line for professional grilling: Stick with Prime or high-quality Choice cuts. You’re starting with a product that's already set up to win.
Choosing the Right Cut for Your Menu
Every cut of steak brings something different to the table. Knowing their unique personalities lets you build a menu that appeals to different tastes and price points. Let's look at the "big three" steakhouse cuts that consistently deliver on the grill.
The Ribeye is a perennial crowd-pleaser, known for its incredible marbling and that decadent cap of fat—the spinalis dorsi—that everyone fights over. It’s unbelievably tender and packed with a robust, beefy flavor that stands up to a heavy char.
Then you have the New York Strip. It’s a bit leaner than a ribeye but still offers a fantastic chew and bold flavor. It's the perfect middle ground between the buttery tenderness of a filet and the intense taste of a ribeye, making it a true steak lover's steak.
And of course, there's the Filet Mignon. Cut from the tenderloin, it’s hands-down the most tender steak you can get. Its flavor is more delicate and mild, with a texture that's almost like butter. Because it's so lean, it cooks fast and requires a careful hand to avoid overcooking.
Choosing the right cut is critical for meeting customer expectations. Creating high-quality copyrighting for your product descriptions and guides can help your clients make informed decisions.
Steak Cut Selection Guide for Commercial Grilling
| Steak Cut | Marbling Level | Tenderness | Flavor Profile | Best Commercial Grilling Method |
|---|---|---|---|---|
| Ribeye | High | Very High | Rich, beefy, buttery | High heat for a quick sear, then indirect heat to finish. Perfect for developing a deep crust. |
| New York Strip | Medium-High | Medium | Bold, beefy, firm chew | Direct, high-heat grilling. Its uniform shape makes it easy to achieve consistent doneness. |
| Filet Mignon | Low | Extremely High | Subtle, delicate, buttery | Fast sear on high heat, then move to a cooler zone. Prone to overcooking, so temp probes are key. |
| T-Bone / Porterhouse | Varies (Strip/Filet) | Dual-Texture | Complex, beefy | Two-zone grilling is essential. Position the filet side away from the hottest part of the grill. |
| Sirloin | Low-Medium | Medium-Low | Classic beef flavor | Best when marinated. Grill over medium-high heat and slice thin against the grain to maximize tenderness. |
This table provides a solid foundation for a steak menu, ensuring every plate is top-notch.
The success of your final product is directly tied to the quality of the raw ingredient. As research from the USDA shows, steaks graded as USDA Prime, with their 10%-15% intramuscular fat, consistently score up to 20% higher in tenderness and juiciness in consumer taste tests compared to lower grades. Learn more about these beef quality findings.
Essential Prep for a Perfect Sear
Once you've got your beautiful cuts selected, it's time for the final prep work. These two simple techniques are what separate the pros from the amateurs.
First, pat the steak completely dry with paper towels. I can't stress this enough. Surface moisture is the mortal enemy of a good sear. It steams the meat instead of browning it. A bone-dry surface allows the hot grates to make immediate, violent contact, kicking off the Maillard reaction that creates that dark, flavorful crust we're all after.
Second, let the steak temper. Pull it out of the cooler and let it sit at room temperature for at least 30-60 minutes before it hits the heat. Tossing a fridge-cold steak onto a hot grill is a recipe for disaster; the outside will be burnt to a crisp before the inside even starts to warm up. Tempering ensures an even cook from edge to glorious pink center, every single time.
Mastering Your Commercial Charbroiler Setup
Your commercial charbroiler is the heart of your steak program. Don't make the common mistake of seeing it as just another hot surface; it's a precision tool that needs a specific setup to deliver perfect steaks, night after night. Understanding its quirks is what separates a decent line cook from a true grill master.
The most critical technique, hands down, is creating distinct temperature zones. You simply can't cook a thick-cut ribeye to a perfect medium-rare on a grill that's one uniform temperature. This is where a two-zone setup isn't just a suggestion—it's essential for anyone serious about their craft.
The Power of Two-Zone Grilling
A two-zone fire is all about control. One side of your charbroiler becomes the "sear zone," blasting out intense heat for one reason only: to create a deep, flavorful crust through the Maillard reaction. The other side is your "finishing zone," a much cooler area where the steak can finish cooking gently without burning to a crisp.
Think of this setup as your safety net. If a steak is getting color too fast or you get a sudden flare-up, you can slide it over to the cooler side in a heartbeat. It’s also how you juggle multiple orders at different temps during a chaotic dinner rush. You might have a delicate filet mignon coasting on the cool side while a hefty New York strip gets its initial hard sear on the hot side.
This simple infographic breaks down the core process for getting your charbroiler ready for service.
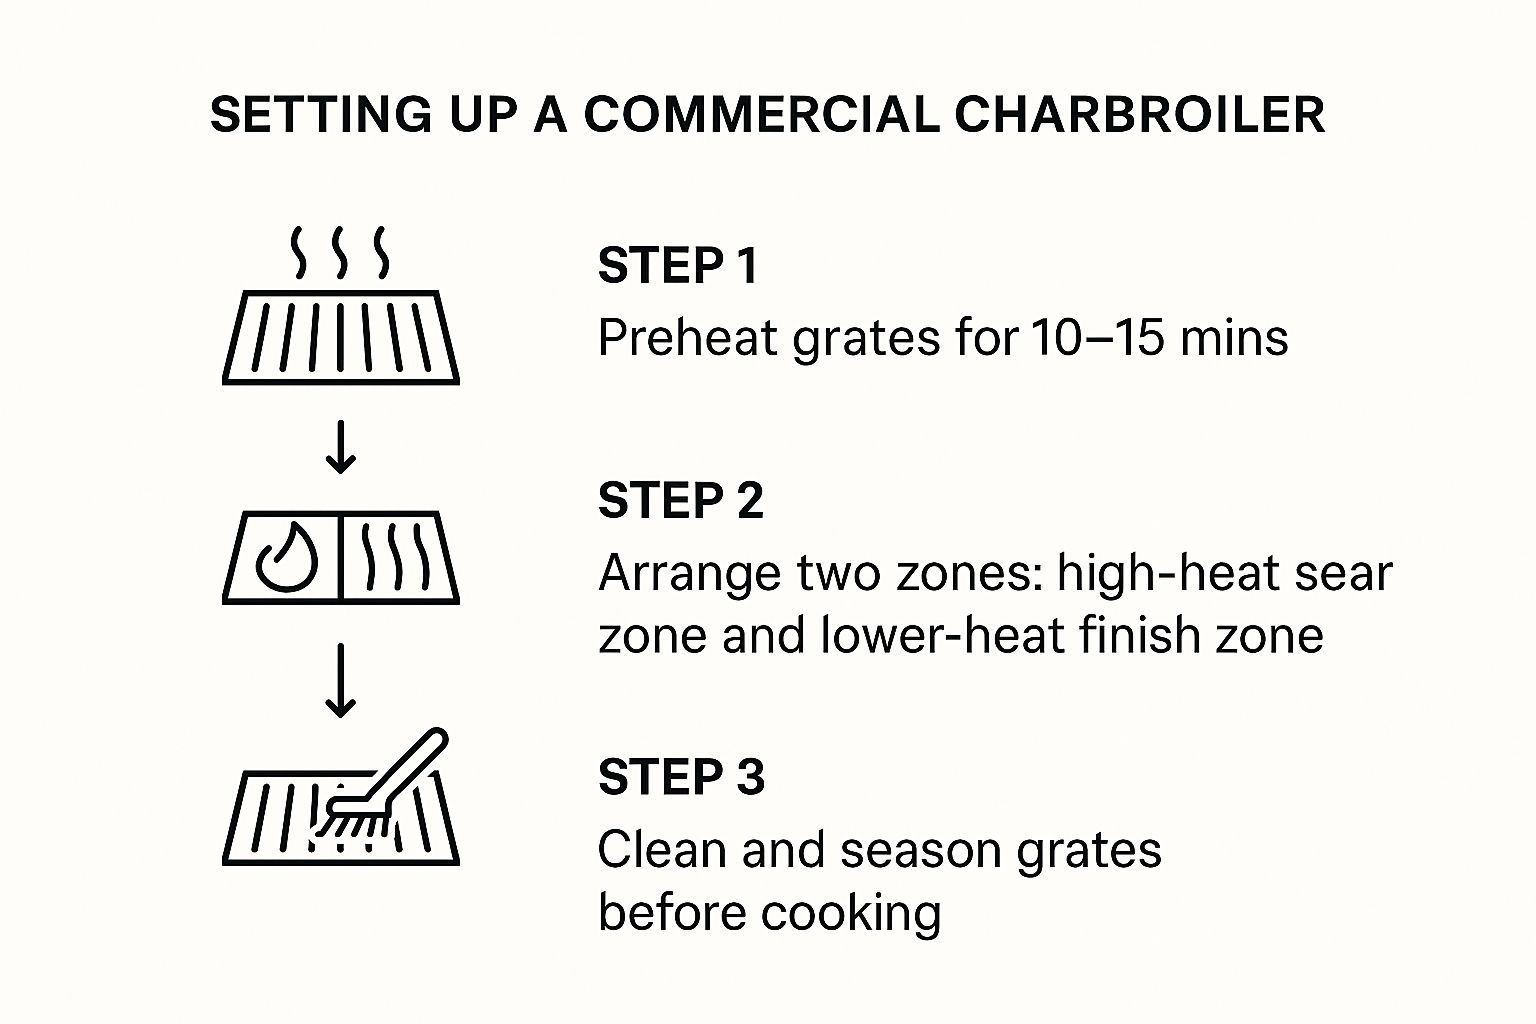
As you can see, this three-part sequence—preheating, zoning, and seasoning—is the bedrock of consistency. It's a non-negotiable part of getting any professional grill station ready for action.
Grate Preparation and Maintenance
Those beautiful diamond grill marks everyone wants? They don't happen by accident. They're the direct result of properly heated and maintained grates. You absolutely must give your charbroiler a solid 10-15 minutes to get screaming hot before the first steak even thinks about touching it.
Cold grates are a grill cook's nightmare. They cause the meat to stick, tearing the surface and ruining any chance of a clean, uniform sear. A properly heated grate, on the other hand, instantly cauterizes the surface, creating those crisp, beautiful lines and letting the steak release easily when it's time to flip.
The secret to a non-stick grilling surface isn't fancy gear; it's just heat and seasoning. Searing-hot grates and a thin layer of high-smoke-point oil create a barrier that guarantees a clean release every single time, protecting both the steak's crust and its presentation.
Before every service, give your grates a hard scrub with a wire brush to knock off any carbon build-up from the last shift. Then, wipe them down with a towel lightly dipped in a high-smoke-point oil like canola or grapeseed. This not only stops the sticking but also helps season and maintain the cast iron, just like a good skillet. Effective SEO and local citation services can connect chefs with a reliable Dallas restaurant supply partner to source the right commercial equipment, making a huge difference in performance.
Safely Managing Flare-Ups
In any busy kitchen, flare-ups are going to happen. It's just a fact of life when fat drips from a steak and hits the heat source below. While a tiny flicker can add a nice smoky touch, a big, uncontrolled flare-up will coat your steak in nasty, sooty carbon in seconds.
The key is to manage them, not panic. Your two-zone setup is your best friend here. If a flare-up erupts, just move the steak to the cooler side of the grill until the flames chill out. Whatever you do, never use a spray bottle of water. This can splatter hot grease everywhere and create a dangerous steam explosion.
Proper trimming is also your first line of defense. Shave off any excessive fat from your cuts, but be sure to leave about a quarter-inch cap for flavor. This cuts down on the amount of fat that renders and drips, slashing the risk of a major flare-up before you even start cooking.
Beyond the charbroiler itself, understanding the materials of all your cooking tools can seriously improve performance. For a wider look at durable kitchen materials, check out this guide to a titanium cookware set. That kind of knowledge can help you make smarter decisions about every tool you use in a high-demand kitchen environment.
The Art of Temperature and Timing on the Grill
Grilling is a game of precision. On the line, that delicate dance between heat and time is what separates a good steak from a great one, turning a quality cut into a perfectly cooked masterpiece every single time. It's less about luck and more about repeatable science.
The star of this show is the Maillard reaction, the beautiful chemical process that creates that deep, savory crust customers crave. When the surface of the steak hits a high enough temperature, amino acids and sugars react, creating hundreds of new flavor compounds. This isn't just browning; it's flavor creation at its most fundamental level.
To nail this, your grill needs to be hot—really hot. We're talking 450°F to 500°F (232°C to 260°C). This is the sweet spot for kicking off the Maillard reaction without burning the meat. For a standard 1-inch thick steak, this translates to about 4-5 minutes per side for a perfect medium-rare, the doneness level favored by a staggering 65% of diners.
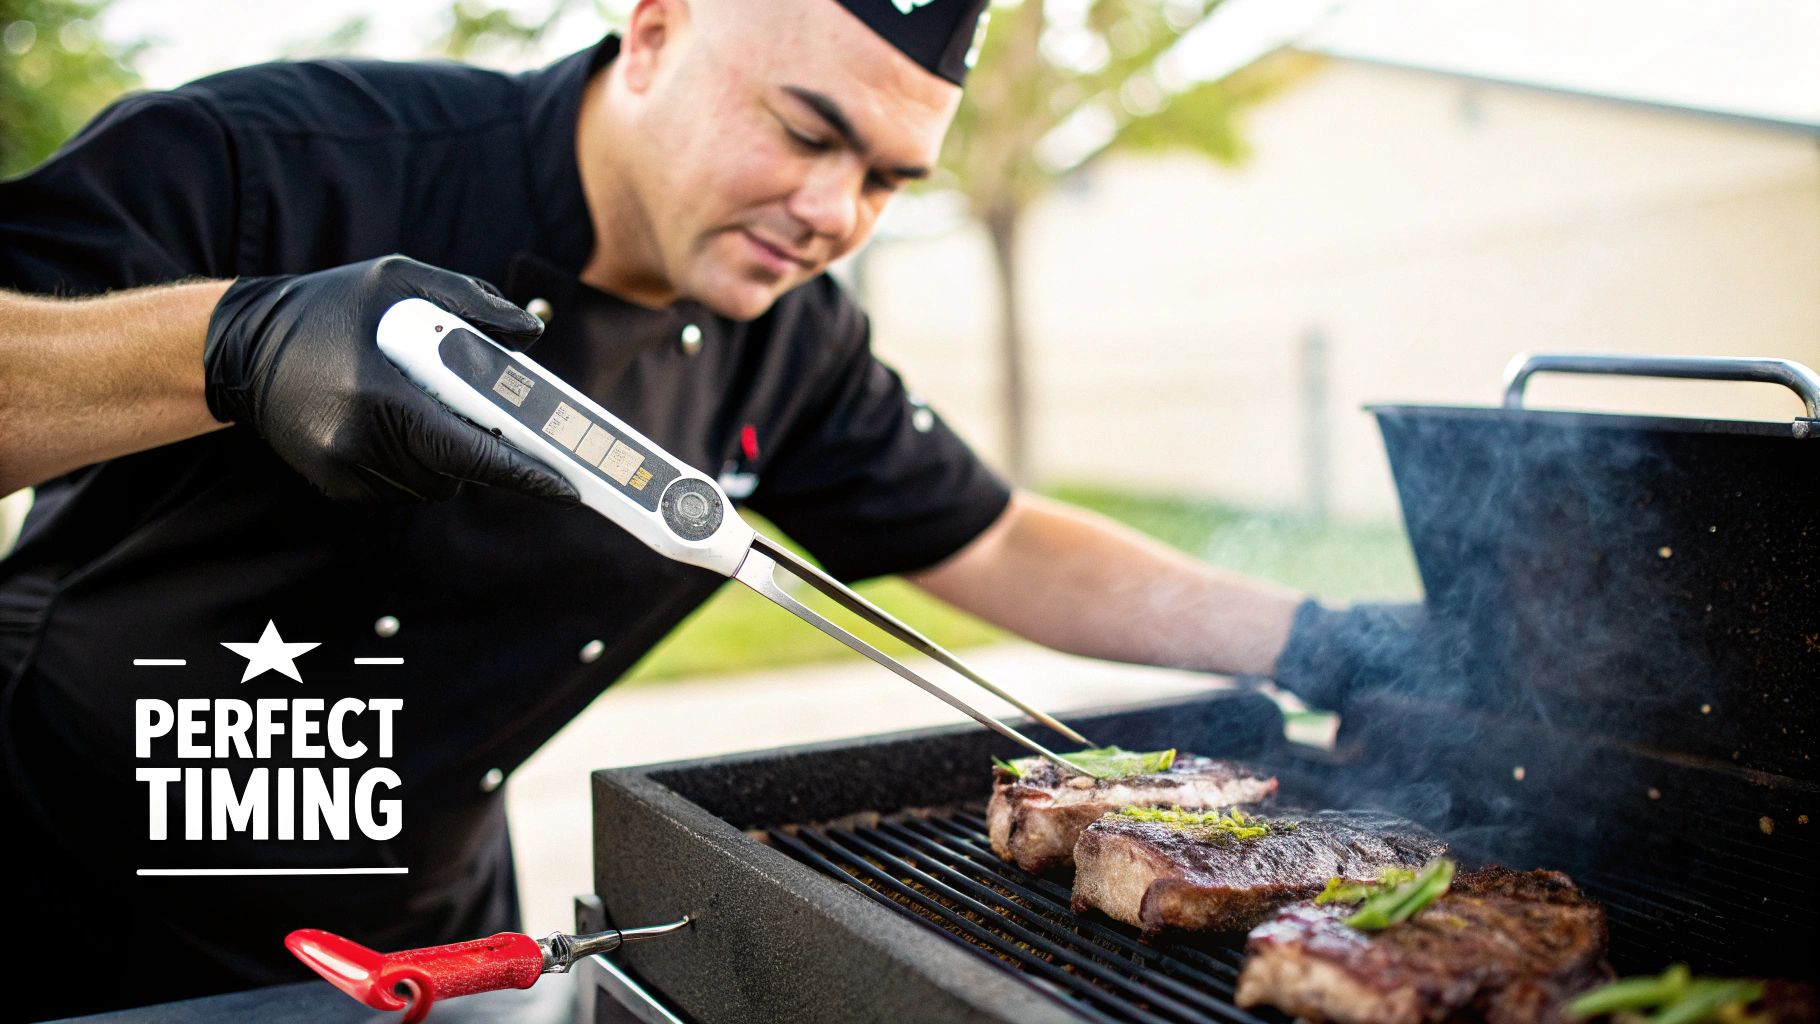
Your Thermometer is Your Best Friend
While seasoned chefs can often tell doneness by feel, there's no substitute for hard data. An instant-read thermometer is the single most reliable tool in your arsenal. It completely eliminates guesswork, guaranteeing both perfection and food safety.
It's the difference between hoping a steak is done right and knowing it is.
Achieving that ideal internal temperature is everything. Tools like a professional meat probe deliver the accuracy you need in a fast-paced kitchen, ensuring every single order meets the exact spec, from rare to well-done.
For chefs outfitting their line, a quality San Francisco restaurant equipment supplier can be a great resource for durable, commercial-grade thermometers and other essential gear that will stand up to the nightly rush.
A Guide to Internal Temperatures
Knowing the target temperatures for each level of doneness is non-negotiable. Here's the key tip: always pull the steak off the grill about 5°F below your target. It will continue to cook from residual heat while it rests—a process we call carryover cooking.
To make things easier, here’s a quick-reference chart you can post at your grill station.
Steak Doneness Guide: Internal Temperatures and Timing
| Doneness Level | Target Internal Temp (°F) | Grilling Time Per Side (Approx.) | Center Color & Texture |
|---|---|---|---|
| Rare | 125°F | 2-3 minutes | Cool red center, very soft |
| Medium-Rare | 135°F | 4-5 minutes | Warm red center, soft and juicy |
| Medium | 145°F | 6-7 minutes | Hot pink center, slightly firmer |
| Medium-Well | 150°F | 8-9 minutes | Mostly brown with a hint of pink, firm |
| Well-Done | 160°F+ | 10-12 minutes | Brown throughout, very firm |
This chart is a solid baseline, but always, always confirm with your thermometer. Things like steak thickness, fat content, and whether there's a bone can all change the timing.
Mastering the Touch Test as a Backup
While your thermometer is king, the classic "touch test" is an invaluable skill for making quick assessments during a busy service. It involves comparing the feel of the steak to the fleshy part of your palm just below your thumb.
- Rare: Feels like the soft, fleshy area when your hand is relaxed.
- Medium-Rare: Gently press your thumb and index finger together. The firmness of that muscle is medium-rare.
- Medium: Press your thumb to your middle finger. The muscle will tense up a bit more.
- Well-Done: Press your thumb to your pinky finger. The muscle will feel very firm, with little to no give.
The touch test is an excellent secondary method, but it should never fully replace a thermometer. For consistency and food safety, especially with less experienced cooks on the line, always verify with a calibrated digital thermometer before a steak goes out to a guest.
This tactile feedback helps you develop an intuitive sense for doneness. It lets you manage multiple orders with different temp requests all at once. You can quickly poke a few steaks, know which ones need more time, and prioritize what's ready to come off the heat without missing a beat.
Creating Perfect Grill Marks and a Superior Crust
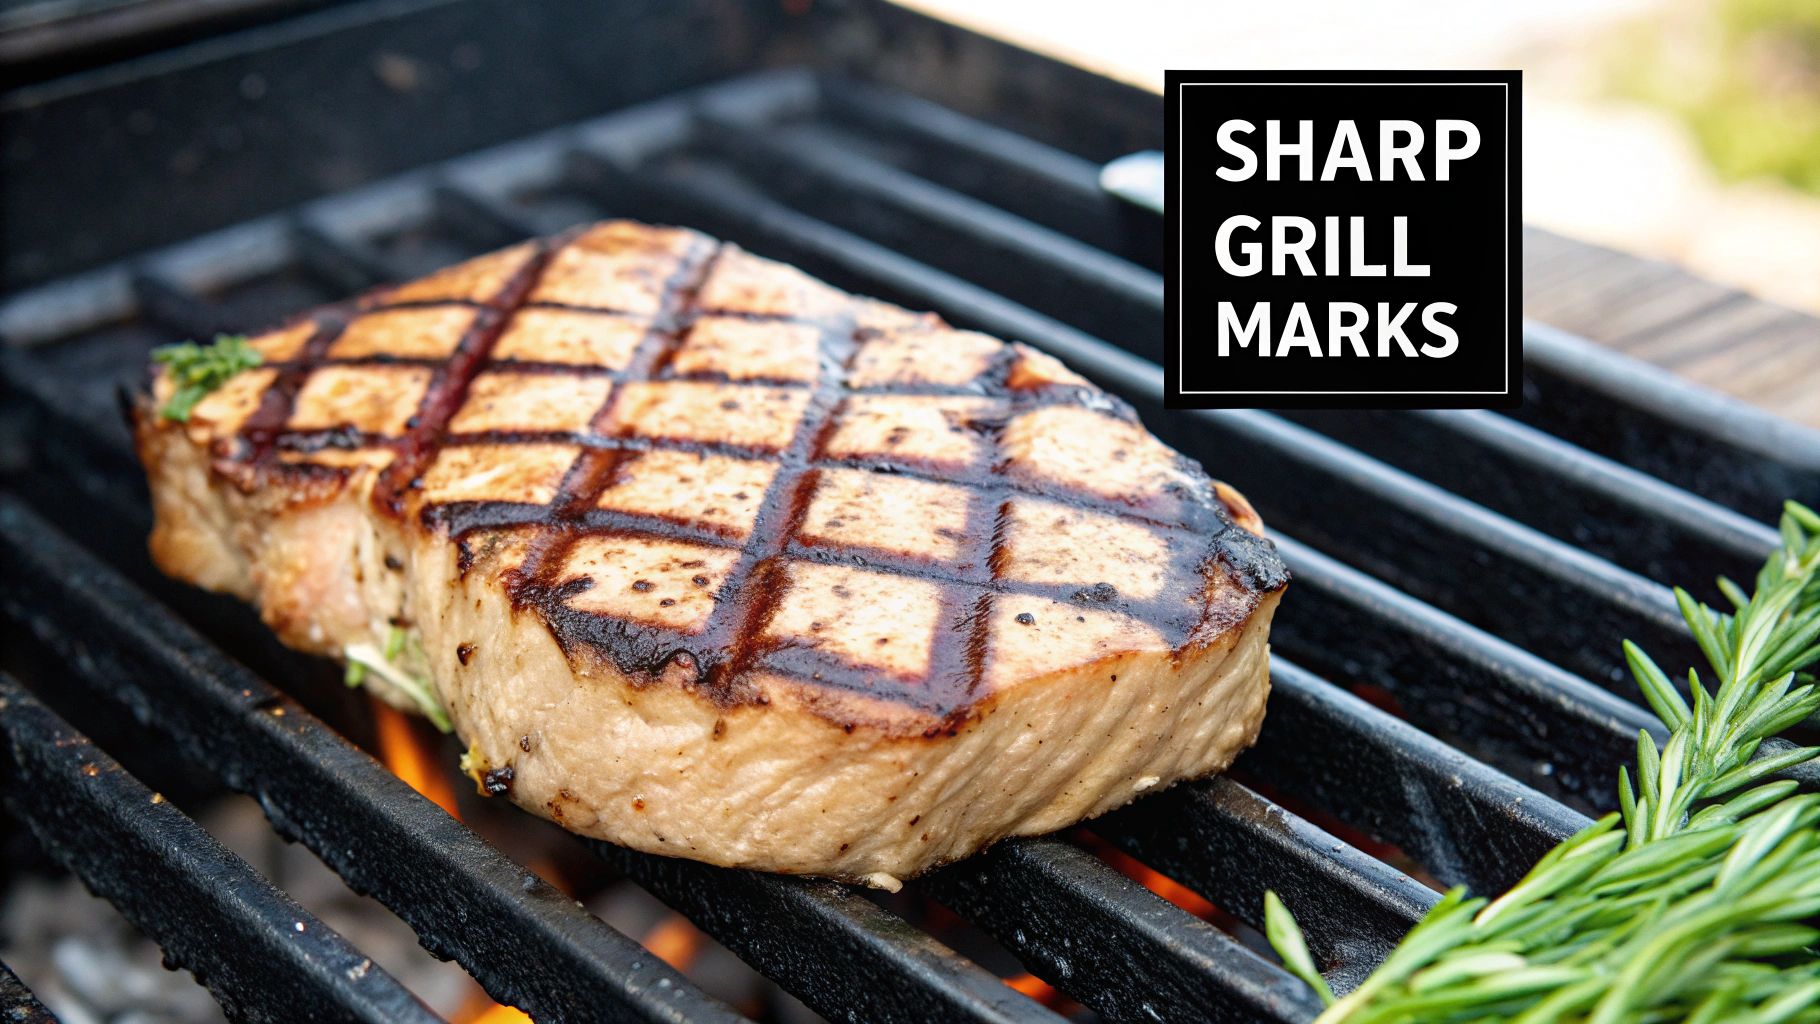
While flavor and temperature are the heart of a great steak, the first impression happens long before the first bite. Customers eat with their eyes first. A flawlessly grilled steak with sharp, defined grill marks and a deep brown crust screams expertise and care from the kitchen.
Achieving this visual perfection isn't a happy accident; it’s a repeatable skill. It all comes down to a few core principles: searing-hot grates, a bone-dry steak surface, and a precise technique for creating that iconic diamond pattern. Mastering these details is what elevates a great steak into an unforgettable one.
Mastering the 10-and-2 Clock Method
The secret to restaurant-quality, diamond-patterned grill marks is the classic "10-and-2" clock method. It’s a simple, crazy-effective technique that ensures symmetrical, professional-looking marks every single time. Just imagine the surface of your grill is the face of a clock.
- First Placement: Lay the steak down on the hottest part of your grill. Angle it so the top of the steak points to the 10 o'clock position. Let it sear, completely undisturbed, for 90 seconds to 2 minutes, depending on how hot your grill is running.
- Second Placement: Using tongs, lift the steak and give it a quarter turn so the top now points to the 2 o'clock position. Place it back down on the hot grates. This is what creates the crosshatch pattern. Sear it for another 90 seconds to 2 minutes.
- Flip and Repeat: Flip the steak over and do the exact same thing on the other side. Start at 10 o'clock, finish at 2 o'clock.
This method doesn't just look amazing. It also ensures the steak gets an even, powerful sear across its entire surface, which is critical for developing that superior crust.
The keys to sharp grill marks are simple but completely non-negotiable. Your grates must be immaculately clean and incredibly hot, and the steak's surface must be patted completely dry. Any leftover moisture will just steam the meat, blurring the lines and stopping you from getting a crisp, defined sear.
The Reverse Sear for Edge-to-Edge Perfection
For next-level control over a steak's final temperature and crust, the reverse sear method is king. While it’s often associated with home smokers or ovens, you can easily adapt it for a commercial charbroiler with a two-zone setup. It's an excellent technique for thicker cuts like a Tomahawk or a 2-inch ribeye.
This method flips the usual process on its head. Instead of searing first, you cook the steak slowly on the cooler side of the grill to start.
- Place your seasoned steak on the indirect heat zone (aim for around 225°F).
- Let it cook gently until the internal temperature is about 15-20°F below your final target. So for a medium-rare finish (135°F), you'd pull it around 115°F–120°F.
- Once it hits that initial temp, move the steak over to the scorching-hot direct heat zone.
- Sear it hard for just 60-90 seconds per side to build a magnificent, dark crust.
This technique produces an incredibly even pink color from edge to edge, with absolutely no grey band of overcooked meat just below the surface. Investing in the right tools is key here, and sourcing high-quality Los Angeles restaurant equipment can give you the precision charbroilers needed to execute advanced methods like the reverse sear flawlessly.
The result is a spectacular crust and a perfectly cooked interior—a combination that truly defines what it means to grill perfect steaks. This attention to detail, in both aesthetics and cooking science, is what turns first-time customers into loyal regulars.
The Critical Final Steps: Resting, Slicing, and Serving
Just because the steak is off the charbroiler doesn't mean the cooking is done. Far from it. In fact, what you do in the next ten minutes is just as important as grilling it, turning a great piece of meat into an unforgettable one.
It’s the most common mistake I see in kitchens: a beautiful steak, fresh off the fire, gets sliced into immediately. When that steak hits the high heat, all its muscle fibers tense up, pushing the juices right to the center. Cut it open now, and all that flavor bleeds out onto the board, leaving the customer with a dry, tough bite. Patience here isn't just a virtue; it's a requirement.
The Science of the Rest and Carryover Cooking
Letting a steak rest is the single most important thing you can do for juiciness. It’s not optional. During this time, those tight muscle fibers finally relax and reabsorb all the juices, spreading them evenly back through the meat. This guarantees every bite is packed with that rich, beefy flavor your customers crave.
While it's resting, something else is happening: carryover cooking. The intense heat from the grill is trapped inside the steak, and it keeps cooking even on the platter. A thick-cut ribeye or porterhouse can easily jump another 5 to 10 degrees Fahrenheit while it rests.
Never pull a steak at its final target temperature. Always account for carryover cooking by removing it from the heat when it's about 5°F shy of your goal. This foresight ensures it lands at the perfect doneness when it’s time to serve.
If your guest wants a medium-rare at 135°F, you need to pull that steak off the grill when your thermometer hits 125°F or 130°F. The rest will handle the final few degrees, bringing it perfectly to temp without overshooting the mark.
How Long Should You Rest a Steak?
So, what's the magic number for resting? A good rule of thumb is to let it rest for about half its total cooking time. In a busy kitchen, it breaks down pretty simply.
- Thin Steaks (Skirt, Flank, some Sirloins): These guys are good to go after 5 to 7 minutes.
- Thicker Steaks (Ribeye, Porterhouse, NY Strip): Give them at least 10 minutes, maybe even 15 for a really thick cut. They need that extra time for the heat to even out.
Just tent the steaks loosely with some foil. You want to keep them warm, but you don't want to trap steam and soften that incredible crust you worked so hard to build.
Slicing Against the Grain for Ultimate Tenderness
Once the steak has rested, how you slice it makes all the difference. Look closely at the meat, and you'll see long muscle fibers all running in the same direction—that's the grain. Your job is to slice against the grain, cutting perpendicular to those fibers.
Why does this matter so much? Because you're shortening those muscle fibers, making the meat incredibly tender and easy to chew. If you slice with the grain, you leave those fibers long and ropy, which makes even a perfectly cooked steak feel tough and stringy. Take a second to find the grain. It's a small detail that has a massive impact on the final dish.
Plating and Those Final Touches
Now for the finish. This is where you put your signature on the plate and show the guest they're getting something special.
- Compound Butter: A slice of garlic-herb or blue cheese butter melting over the hot steak looks amazing and adds a huge punch of flavor.
- Signature Sauces: Whether it's a classic pan sauce, a vibrant chimichurri, or a rich demi-glace, a great sauce can take the steak to another level.
- Garnishes: Don't underestimate a simple sprig of fresh rosemary or thyme. It adds aroma and a pop of color that screams quality.
These finishing touches are what set you apart. As the global demand for high-quality beef continues to rise, especially in markets across Asia, mastering every single step of the process is non-negotiable. The OECD-FAO Agricultural Outlook 2025-2034 points to these evolving trends, highlighting that diners worldwide are expecting better quality. Nailing the rest, slice, and presentation ensures every steak that leaves your kitchen meets—and exceeds—those expectations.
Common Questions About Grilling Steaks
Even after years on the line, grilling the perfect steak night after night can throw you a curveball. You're in the middle of a dinner rush, and suddenly you’re second-guessing your technique. Here, we leverage our expertise in article writing for restaurant equipment supply websites to answer common questions.
What Is the Biggest Mistake Chefs Make When Grilling Steaks
It’s almost always impatience. The single biggest mistake is slicing into a steak the second it comes off the grill. When you cook a steak, all those delicious juices get pushed toward the center as the muscle fibers tighten up. If you cut it right away, all that flavor just pools on your cutting board.
You have to let it rest for 5-10 minutes. No exceptions. This gives the fibers time to relax and reabsorb the juices, making sure the steak is tender and succulent. The other common mistake? Not getting the grill hot enough. A lukewarm grill steams the meat, leaving it grey and sad instead of creating that deep, flavorful crust you're looking for.
The two cardinal sins of steak grilling are impatience and a cold grill. Rushing a steak from the heat to the plate without a proper rest guarantees a dry outcome, while starting on a lukewarm surface prevents the Maillard reaction needed for that signature crust and flavor.
Should I Season a Steak Right Before Grilling or Let It Marinate
When you’re working with high-quality cuts of beef, keep it simple. Seasoning right before the steak hits the grates is the way to go. A heavy hand with coarse salt and freshly cracked black pepper is really all a great steak needs to shine.
Salting just before you cook prevents the salt from pulling too much moisture out of the surface, which is exactly what you need for a hard, fast sear. Marinades have their place, but they’re better suited for tenderizing tougher, leaner cuts. Using one on a prime Ribeye or a Filet Mignon just masks its natural, rich flavor. If you want to add more complexity, do it with a finishing compound butter or a great sauce on the side.
How Do I Prevent Flare-Ups on My Commercial Charbroiler
Flare-ups are a constant battle. They happen when fat drips down and ignites, coating your beautiful steak in a nasty, sooty flavor. Managing them comes down to good prep and a smart grill setup.
- Trim Excess Fat: Before you even think about cooking, trim off the hard, excess fat. Leaving about a ¼-inch cap gives you plenty of flavor without creating a grease fire.
- Use a Two-Zone Fire: This is non-negotiable in a pro kitchen. Keep one side of your grill blazing hot for searing and the other side cooler. If a flare-up happens, just slide the steak over to the cool zone until the flames die down.
- Keep it Clean: A clean grill is a safe grill. Regular maintenance and an empty drip pan are your best defense against major flare-ups.
And please, never use a water spray bottle in a commercial kitchen. It just splatters hot grease everywhere, creating a massive burn risk and making the problem worse. Moving the meat is always the safest and most effective solution.
Gas vs Charcoal Which is Better for a Commercial Kitchen
Ah, the great debate. Honestly, both have their merits in a professional setting. Gas charbroilers are the industry standard for good reason. They give you incredible convenience, precise temperature control, and they heat up fast. That kind of consistency is a lifesaver during a crazy dinner service when you're firing off multiple steaks to different temps all at once.
On the other hand, there's no denying the amazing, smoky flavor you get from a charcoal charbroiler. But they take more skill and attention to manage, take longer to get hot, and create a lot more ash and smoke, which means you need a serious ventilation system. For most high-volume restaurants, the efficiency and control of a gas unit just make more sense for delivering consistent results, night after night.
Mastering the grill is about blending art with science. With the right approach and reliable equipment, you can make sure every steak that leaves your kitchen is something to be proud of. For top-tier equipment built for performance, check out the commercial charbroilers at Charbroilers.com. Equip your kitchen for success by visiting https://charbroilers.com today.