

How to Grill Fish Without Sticking
The secret to grilling fish without it sticking comes down to three things: a bone-dry fillet, a screaming hot grill grate, and a thin layer of high-smoke-point oil. If you can nail these three elements before that fish ever sees the charbroiler, you’ve mastered the professional secret to a perfect, clean release every single time.
Prep Secrets for Non-Stick Fish Grilling
Any chef worth their salt knows a great dish starts long before the fire is lit. This couldn't be more true for grilled fish. The fight against sticking is won or lost on the prep table, where the small details make all the difference.
Choose Your Fish Wisely
Not all fish are built for the intense, direct heat of a commercial charbroiler. Your first job is to pick a fillet that can actually handle the heat without falling apart.
- Firm-fleshed fish are your best friends here. Think swordfish, halibut, tuna, and mahi-mahi. Their dense, meaty texture holds its own and won’t flake into oblivion.
- Oily fish like salmon and mackerel are also great contenders. Their natural fat content acts as a built-in defense against sticking.
- Delicate fish such as cod, tilapia, or flounder? These are notoriously tricky. It's not impossible to grill them, but they need a ton of extra care and are often better candidates for foil packets or grill baskets.
Moisture Is the Enemy
What’s the number one reason fish sticks to the grill? Water. When a wet fillet hits a hot grate, it creates instant steam, essentially gluing the delicate proteins right to the metal.
Patting the fish dry with a paper towel is a good start, but in a pro kitchen, we take it a step further.
After patting it dry, set the fish on a wire rack, uncovered, in the cooler for 30-60 minutes. This lets cold, dry air circulate all around the fillet, creating a tacky, dry surface called a pellicle. This is the key to getting a beautiful sear and a clean release.
Pro Tip: A fundamental step in ensuring fish doesn't stick is proper grill preparation. Part of this involves creating a non-stick cooking surface, which is a technique you can master when you learn how to season cast iron for a non-stick surface.
Use Marinades to Your Advantage
While oil-based marinades are great for flavor, acidic ones can do double duty by chemically changing the fish's surface. A 2021 study showed that marinating fish in ingredients like lemon juice or vinegar can cut down on sticking by up to 40%. The acid helps firm up the proteins before they ever hit the heat.
Just don’t forget the most important step: pat the fish completely dry after it comes out of the marinade. You have to get that surface moisture off.
Proper preparation is everything in this business. As a company that provides information on SEO, local citation services, blog posting, blogger outreach, copyrighting, and article writing for restaurant equipment supply websites, we know that success is in the details. Learn more about expert SEO and content strategies.
Mastering Your Grill for a Flawless Sear
Now that your fish is prepped and ready, let's turn to the most critical tool in the equation: your commercial charbroiler. Don't think of it as just a heat source. Your grill is your partner in creating that perfect, non-stick surface. Success really comes down to three things: keeping it clean, getting it seriously hot, and oiling it the right way.
A dirty grill is a sticky grill, plain and simple. All those carbonized bits left over from the last service act like tiny hooks, just waiting to grab onto delicate fish proteins and tear them apart. Before a single fillet hits the heat, you have to scrub those grates down to the bare metal with a stiff wire brush. I'm not talking about a quick wipe—this is non-negotiable.
The Critical Role of High Heat
Once the grates are spotless, it's all about the heat. A lukewarm grill is the number one reason fish sticks. You need that surface temperature to be incredibly hot, at least 400°F, to instantly sear the outside of the fish. This creates a crust that naturally releases from the grates.
No infrared thermometer? No problem. Just use the water test. Flick a few drops of water onto the grates. If they dance, sizzle, and evaporate in a flash, you're good to go. If they just sit there and bubble away slowly, be patient and give it more time.
This isn't just kitchen folklore; it's a proven technique. In Spain, where grilled fish is a way of life, a 2023 study showed that 80% of professional chefs preheat their grills to at least 400°F (204°C) and oil both the fish and the grates. This simple one-two punch cut down on sticking incidents by a whopping 70%.
This visualization shows the straightforward flow of prepping fish to prevent sticking, moving from the whole fish to drying and marinating.
The process highlights that removing moisture and preparing the fish's surface are foundational steps before it ever approaches the grill.
Choosing and Applying the Right Oil
The final piece of the puzzle is oil, but not just any oil will cut it. You need something with a high smoke point that can handle the intense heat of a charbroiler without burning and turning your beautiful fillet bitter.
Selecting the right oil is key to creating a non-stick barrier that won't break down under pressure. Here’s a quick rundown of some solid choices for the professional kitchen.
Best Oils for High-Heat Grilling
| Oil Type | Smoke Point (°F) | Flavor Profile | Best For |
|---|---|---|---|
| Avocado Oil | 520°F | Neutral, slightly buttery | Extremely high-heat searing; versatile for any fish. |
| Grapeseed Oil | 420°F | Clean, neutral | A great all-purpose choice that won't interfere with delicate fish flavors. |
| Canola Oil | 400°F | Neutral | Cost-effective and reliable for everyday grilling needs. |
Understanding how different fats react to heat is a game-changer. For instance, many chefs are surprised to learn the nuances of using olive oil for high-heat cooking and when to choose a refined version over extra virgin. It's these small details that separate good from great.
The Professional Method: Never oil cold grates. Get them screaming hot first. Then, take a folded-up kitchen towel, dip it in your high-smoke-point oil, and hold it with a pair of long tongs. Give the hot grates a quick, careful wipe just seconds before the fish goes down. This creates a temporary, slick shield that guarantees a clean release every time.
Keep in mind that how you work matters, too. The flow of your kitchen can make or break your efficiency during a busy service. For more on that, take a look at our guide on https://restaurantequipmentseo.com/blogs/restaurant-equipment-seo-blog/commercial-kitchen-design-layout.
The Right Way to Place and Flip Your Fish
All the preparation in the world won't matter if your technique on the grill is clumsy. Handling delicate fillets in a high-pressure kitchen is an art form, separating seasoned chefs from rookies. It really boils down to two things: precise placement and patient timing. Get these right, and every piece of fish will come off the charbroiler as flawlessly as it went on.
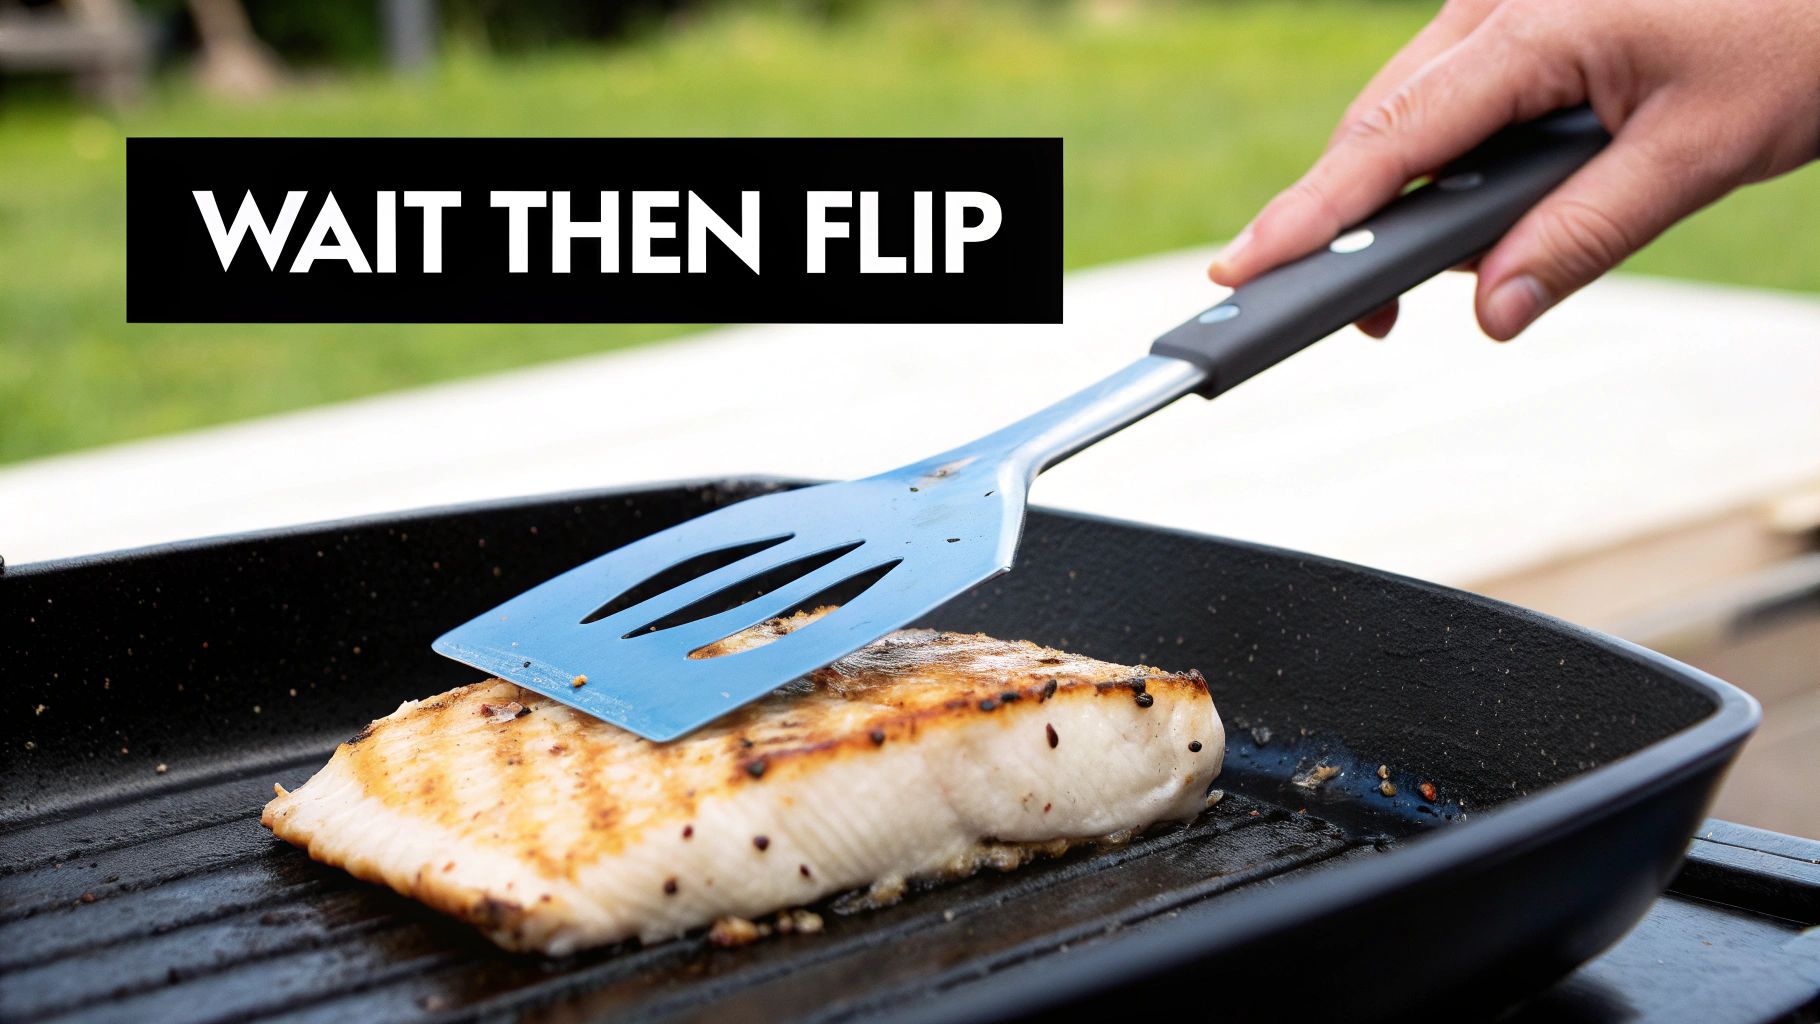
When you’re ready to cook, gently lay the fish on those screaming hot, oiled grates. Your goal is to place it once and not touch it again until it’s time to flip. The most common mistake is impatience—trying to move, lift, or check the fish too early will tear the delicate flesh and leave half your beautiful fillet stuck to the grill.
Let the Fish Tell You When It's Ready
So, how do you know when it's time? The fish will tell you. The moment it hits the hot grates, the proteins start to cook and form a crust. Initially, they'll seize up and stick firmly to the metal. This is completely normal.
As that perfect crust develops, the proteins will naturally release from the grates. This process is your signal. To check, just gently nudge the corner of the fillet with your spatula.
- If you feel any resistance, it’s not ready. Step back and give it another 30-60 seconds.
- If it moves freely with just a light push, it has formed a perfect sear and is ready for the flip.
Resisting the urge to mess with the fish prematurely is the single most important part of the entire process. You have to trust the heat, trust the sear, and let the fish release itself.
The Right Tool for the Job
Tongs are great for steaks and burgers, but they are the enemy of grilled fish. They apply pressure from two points, which is a guaranteed way to break a delicate fillet in half. The essential tool for this job is a thin, flexible fish spatula, sometimes called a fish turner.
Its wide, slotted head and offset handle are specifically designed to slide cleanly under the whole fillet. That thin, flexible metal can get right between the grate and the fish’s crust without tearing it.
Proper Flipping Technique: Don't just lift the fish straight up. Instead, slide the spatula completely underneath the fillet from one side. Once it's fully supported, use a smooth, confident wrist motion to turn it over. Place it down gently in a new, hot spot on the grill to ensure the second side gets an equally impressive sear.
This combination of patience and proper tooling is what defines professional execution. By letting the sear do the work and using a tool designed for the job, you eliminate the guesswork and guarantee a clean flip every single time, even during the busiest dinner rush. This is the approach to grilling fish without sticking that keeps customers coming back for perfectly cooked seafood.
Smart Alternatives To Direct Grilling
If you’ve ever watched a delicate fillet shred to pieces the moment you try to lift it off the grate, you know the pain. In professional kitchens, chefs often bypass direct contact with the bars to keep cod, tilapia or flounder perfectly intact. These savvy workarounds not only prevent sticking but also introduce subtle new flavors you can’t achieve any other way.
Once you’ve got these alternatives in your arsenal, you’ll be ready for every fish on the menu—whether it’s a high-volume lunch rush or an à la carte dinner service.
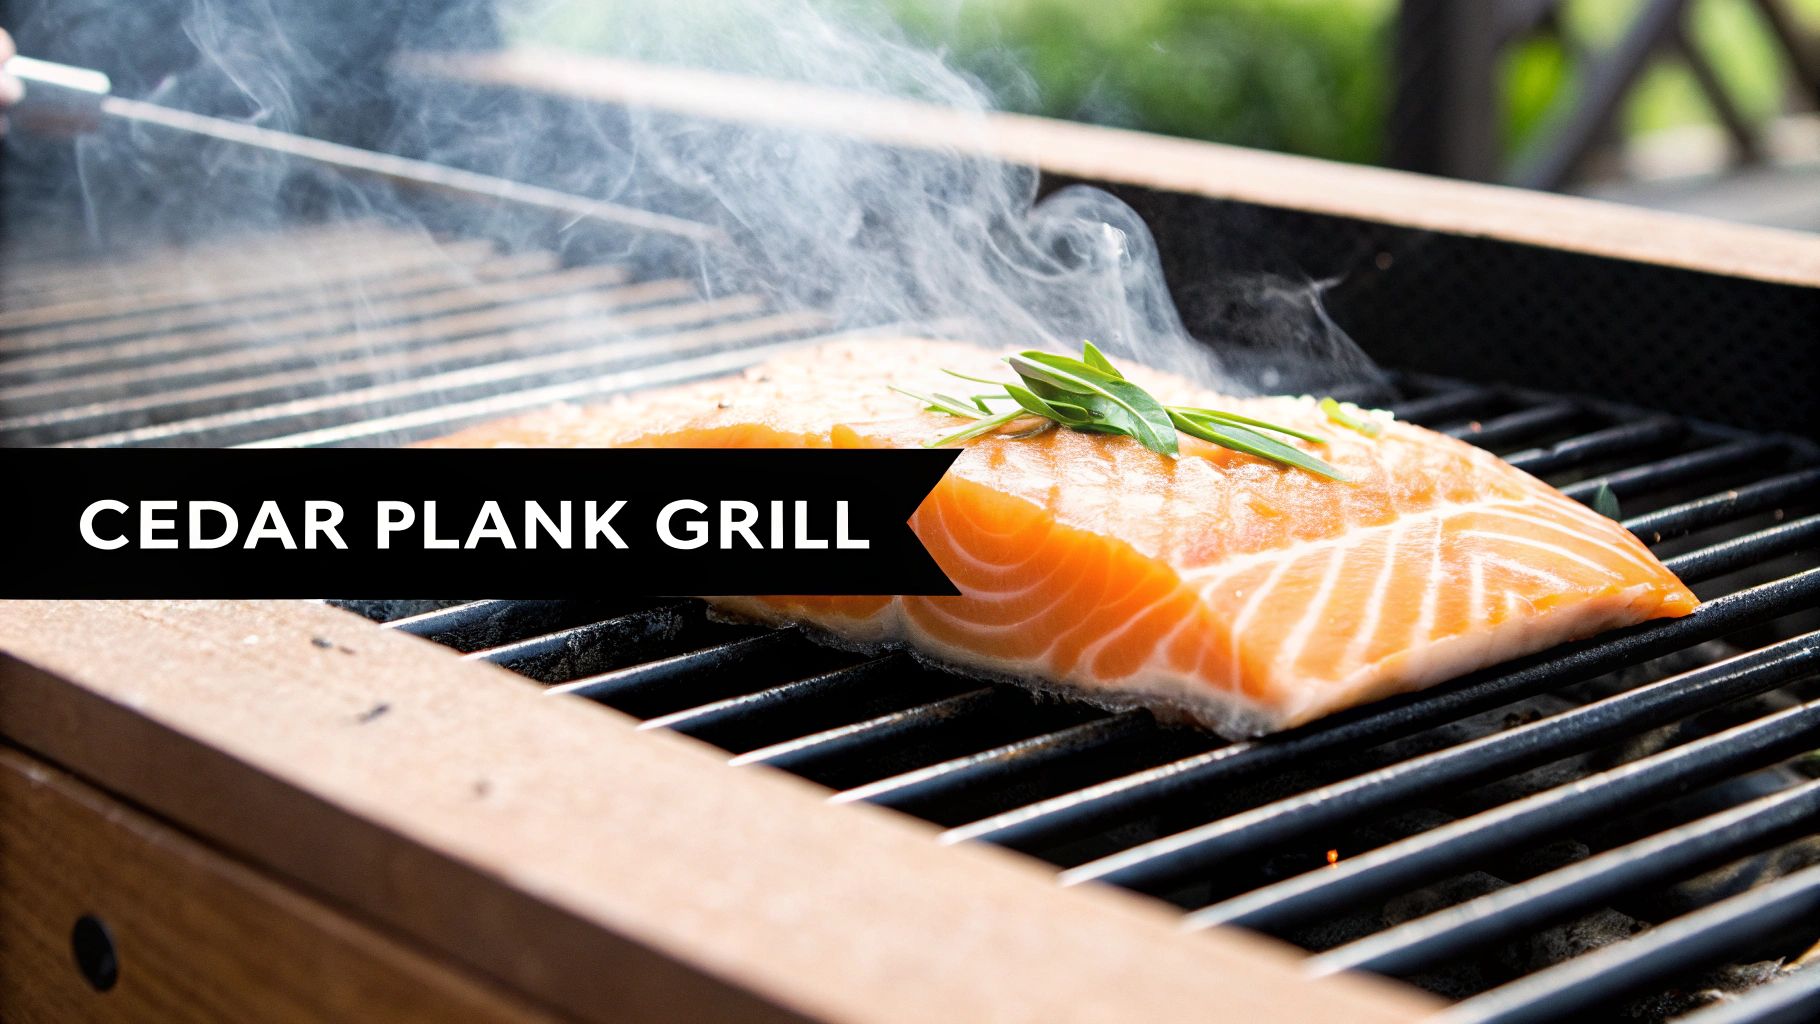
Cedar Plank Grilling For Smoky Flavor
There’s a reason cedar‐plank grilling is a mainstay in top kitchens. It’s almost impossible to mess up, and it infuses the fish with a delicate, wood-smoke aroma that brings depth to every bite.
- The Process: Fully submerge a food-grade cedar plank in water for at least one hour (overnight if you have the time). Lay your seasoned fillet skin-side down on the damp plank, then slide the entire assembly onto the hot charbroiler.
- The Result: As the plank heats, its moisture turns to steam beneath the fish, while the underside smolders just enough to drift smoky tendrils up through the flesh. The fillet never touches the grates, guaranteeing zero sticking.
This approach shines with salmon or trout when you want that rustic, wood-driven character to take center stage.
Using Grill Baskets And Foil Packets
When you’re handling smaller pieces or chopped fish for salads, tacos or soups, nothing beats the reliability of baskets and foil pouches. They deliver consistent results, even during a packed service.
• A hinged grill basket holds multiple fillets or a whole small fish securely in place. Just brush the basket with oil, arrange the fish inside, lock it closed—and flip everything at once without fear of breakage.
• Foil packets create a mini steam oven. Tuck in your fish, a handful of veggies, fresh herbs and a splash of white wine or stock. Seal tightly, place on the grates, and let the enclosed steam gently cook the fillet while mingling all the flavors.
According to the National Restaurant Association, these methods are far from niche. A 2022 report revealed that 62% of seafood restaurants in the United States use fish baskets or foil for grilling, pointing to improved presentation and a significant reduction in sticking as the main drivers. Discover more insights about the seafood market on Fortune Business Insights.
Choosing between planks, baskets or packets depends on what you’re going for—rich smoke, easy handling or a one-pan infusion of flavor. Master all three, and you’ll never lose a precious fillet again.
Troubleshooting Common Grilling Problems
Even the most seasoned grill cook runs into trouble during a busy service. It’s inevitable. One minute everything is running like a well-oiled machine, the next you’ve got a flare-up threatening a beautiful piece of halibut or a salmon fillet that’s welded itself to the grates.
Knowing how to handle these moments on the fly is what makes a great line cook. It’s about keeping your cool and fixing the problem before the customer ever knows there was one.
The most common gut-wrenching moment? When you go to flip a perfect fillet and it won’t budge. We’ve all been there. Your first instinct might be to panic and try to scrape it off with a spatula, but that just shreds the fish. Take a breath.
The most common reason for sticking is simple: it’s not ready. The fish hasn't developed that perfect crust that allows it to release cleanly from the hot metal. Give it another 30 seconds. That little bit of extra time often does the trick. If it’s still stuck, try gently lifting a different corner—your grill has hot spots, and one side might be ready before the other.
Handling Flare-Ups and Grill Hot Spots
Flare-ups are another classic kitchen headache, especially with oily fish or heavy marinades. A sudden burst of flame can scorch the outside of a fillet in seconds, leaving the inside raw. Quick, calm action is your best friend here.
- Move the Fish: Don’t hesitate. Slide the fish to a cooler part of the grill immediately. Every charbroiler has its own temperature geography; learn yours and use it to your advantage.
- Don't Use Water: This is a cardinal rule in a commercial kitchen. Throwing water on a grease fire is a recipe for disaster. It will spread the flames, not extinguish them.
- Manage the Drip: If you're working with something extra fatty like mackerel, think ahead. Position it so the drippings don't hit the heating element or flame directly.
A fast reaction can save the dish, turning a potential disaster into a non-issue.
Adjusting for Different Charbroiler Types
How you solve a problem often depends on the gear you’re working with. A radiant charbroiler behaves very differently from a lava rock model, and your troubleshooting needs to reflect that.
Radiant grills hit hard and fast with intense, direct heat. They’re fantastic for getting a quick, deep sear, but they don't forgive mistakes. If your fish is sticking on a radiant grill, it's almost always because the grates weren't hot enough to begin with. Lava rock grills are a different beast—they give you a more diffused, smoky heat. Sticking here is often a sign of dirty, grease-clogged rocks causing uneven heat.
Think of it this way:
| Grill Type | Common Sticking Cause | Troubleshooting Tip |
|---|---|---|
| Radiant Charbroiler | Grates weren't hot enough on contact. | Be patient with your preheat. You need to hear a loud, aggressive sizzle the second the fish hits the metal. |
| Lava Rock Charbroiler | Dirty rocks are creating hot and cold spots. | Flip or replace your lava rocks regularly. Clean grates and consistent heat are your best defense. |
In the end, putting out fires—both literal and figurative—mid-service is all about composure and knowing your equipment inside and out. Reacting properly to a stuck fillet or a sudden flare-up is the mark of a true professional. It’s how you guarantee consistency, even when the pressure is on.
Why Grill Maintenance Is Not Optional
Your ability to grill a perfect piece of fish tomorrow hinges entirely on how you treat your charbroiler today. Seriously. Every beautiful, cross-hatched fillet with a clean release is built on a foundation of consistent, daily grill care.
In a busy kitchen, a neglected grill isn't just a cleaning task you'll get to later. It's a direct cause of poor performance, ruined food, and a backed-up service line.
The number one enemy of non-stick grilling is carbon buildup. That blackened, crusty gunk left over from steaks, burgers, and yesterday's fish creates a rough, sticky surface. Delicate fish proteins grab onto it like glue. A properly maintained grill, on the other hand, is a line cook's best friend.
Establishing a Cleaning Routine
Consistency is everything. A simple, non-negotiable cleaning schedule stops the kind of buildup that takes a whole afternoon and a lot of elbow grease to fix. Think of it as a daily, weekly, and monthly investment in quality.
This disciplined approach means your charbroiler is always ready for action, heading off problems before they can ruin a dish. It also has a huge impact on your kitchen environment. Proper upkeep cuts down on excessive smoke and aerosolized grease, which is a big part of maintaining good air quality and meeting commercial kitchen ventilation requirements.
A simple, effective routine looks like this:
- Daily: After every single service, while the grates are still hot, give them a thorough scrape-down with a stiff wire brush or a grill brick. This is mandatory. It gets rid of the bulk of the day's residue before it has a chance to set.
- Weekly: Time for a deep-clean "burn-off." Crank the charbroiler to its highest setting for 15-20 minutes. This incinerates any stubborn, lingering food particles, turning them into a fine white ash that you can easily brush away.
- Monthly: Pull the grates completely off the unit. If they need it, give them a good soak and then scrub them down to the bare metal. This is also the perfect time to get in there and clean out all the gunk that's collected underneath the grates.
The Importance of Re-Seasoning
After a deep clean, especially a high-heat burn-off, you’ve essentially stripped the grates of their protective, semi-non-stick layer. The final, and most crucial, step is to re-season them. This isn't just a trick for cast iron pans; it's absolutely essential for any professional grill surface.
Pro Technique: Once the grates are clean and back in place, heat the grill to medium-high. Grab a clean rag with your tongs, dip it in a high-smoke-point oil (canola or grapeseed work great), and wipe a very thin, even coat over the entire surface. Let it smoke for a few minutes. You'll see the oil polymerize, creating a fresh, slick cooking surface.
This one simple act restores that protective barrier and gets your grill ready for the next shift. It ensures that the first fillet you cook tomorrow has the same chance at perfection as the last one you cooked today. It transforms maintenance from a chore into a core part of your culinary technique.
For top-tier commercial charbroilers designed to withstand the demands of a busy kitchen, explore the extensive selection at Charbroilers.com. Find the perfect unit for your establishment at https://charbroilers.com.