
Mastering Cleaning and Seasoning Cast Iron for Perfect Results
When we talk about cleaning and seasoning cast iron, we're really talking about the foundational practice that turns a simple hunk of metal into a kitchen legend. It's the art of bonding oil to the pan through heat, creating a natural, rust-proof, and non-stick cooking surface that just gets better with age. As a leading information provider for restaurant equipment supply websites, we've seen firsthand how mastering this skill transforms a kitchen's efficiency and output.
This process is called polymerization, and it's the secret sauce that transforms a basic skillet into a high-performance workhorse. It’s precisely why a good cast iron pan can be passed down for generations, improving with every single use.
Why You Can't Skip Proper Cast Iron Seasoning
Look, understanding the "why" behind cast iron care is more than just a cleaning routine—it's the key to unlocking its incredible cooking potential. The whole goal is to build up and maintain a solid layer of polymerized oil. Think of it as a hard, plastic-like coating that's chemically bonded right to the iron. Through our experience in article writing and SEO for the restaurant industry, we know that content explaining these core principles resonates with both chefs and home cooks.
This isn't just a film of grease; it's a completely new substance that shields the pan and gives it that famous non-stick quality. For any kitchen, from a bustling restaurant to a home cook's stovetop, that seasoned layer is what makes cast iron so darn versatile. It’s the difference between a pan that rusts after one wash and one that can sear a perfect steak, slide out fried eggs, and bake flawless cornbread.
The Foundation of Durability and Performance
A well-seasoned pan is an investment. It's an investment in longevity, and it's an investment in flavor. Every time you cook with fats or oils and follow the right cleaning steps, you're adding another micro-layer to that protective coating. It’s a continuous process that slowly turns a dull gray piece of iron into a deep black, glossy kitchen icon.
That seasoning is doing a few critical jobs for you:
- Creates a Natural Non-Stick Surface: Forget the chemical coatings. A properly polymerized oil layer provides an incredibly effective release for food. Cooking is easier, and cleanup is a breeze.
- Prevents Rust Formation: Cast iron will rust if you look at it wrong. It's just iron, after all. The seasoning creates a crucial barrier, shielding the raw metal from the moisture in the air.
- Enhances Flavor Over Time: As the seasoning builds, it adds a subtle, unique character to your dishes. This is exactly why chefs and collectors hunt down vintage skillets—that history is baked right in.
This isn't some new-fangled idea; it's a technique that's been refined over centuries. While cast iron has been around since the 5th century, its popularity exploded in 19th-century America as families came to rely on these nearly indestructible pans. Back then, they used what they had—animal fats like lard—to create that protective layer.
Today, that tradition is stronger than ever. The global market for cast iron cookware is projected to hit USD 7.37 billion by 2030. You can dig into the numbers yourself in this cast iron cookware market analysis from Grandview Research. This booming interest just proves how essential these timeless maintenance techniques are for getting the most out of your cookware.
Your Daily Ritual for Cleaning Cast Iron
Proper daily cleaning is the secret to keeping your cast iron's hard-earned seasoning in top shape. You can forget all the complicated myths you’ve heard. The process is actually straightforward and quick, making sure your pan is always ready for the next service. The goal is simple: get the food residue off without stripping away that protective layer you’ve worked so hard to build.
The first and most important rule? Clean the pan while it’s still warm, but not screaming hot. A warm pan makes cleanup a breeze because food hasn't had a chance to harden into a stubborn, crusty mess. Whatever you do, never plunge a hot skillet into cold water. That kind of thermal shock can crack it, permanently ruining what should be an indestructible tool.
For most day-to-day cleaning, a stiff brush and hot water are all you'll need. That simple combo is usually enough to dislodge food particles from a well-seasoned surface. If you want to make the job even easier, you can find specialized dish scrub brushes and scouring pads that work great on cast iron.
Handling Stuck-On Food
Sometimes, you’re going to face a bigger challenge, especially after searing steaks or cooking with sugary glazes that love to stick. Instead of resorting to aggressive scrubbing that can damage your seasoning, just use a simple deglazing trick. Pour a little bit of water into the still-warm pan and put it back on the heat. As the water starts to simmer, gently scrape the bottom with a flat-edged wooden spoon or a pan scraper. The gunk will lift right off.
For those extra-stubborn spots, a paste made from coarse kosher salt and a splash of water works wonders. The salt acts as a gentle abrasive, lifting away stuck-on food without being harsh enough to ruin that polymerized oil layer. Just scrub with the paste, rinse it out, and you’re ready for the next step.
The Soap Debate Settled: Yes, you can absolutely use a small amount of mild dish soap on your cast iron. The old myth about avoiding soap comes from a time when soaps contained harsh chemicals like lye. Today’s gentle detergents are perfectly safe for a well-seasoned pan and won’t strip the finish. Just wash it and rinse it—don't let it soak.
The Most Crucial Step: Drying Your Skillet
After washing, thoroughly drying your cast iron is non-negotiable. Any moisture left behind is basically an open invitation for rust, the number one enemy of your skillet. A towel helps, but it won’t get all the moisture out of the iron’s porous surface.
The best way to get it bone-dry is to place the clean pan on a burner over low heat for a few minutes. You’ll literally see the last traces of water evaporate. Once it’s completely dry, turn off the heat and move on to the final maintenance step while the pan is still warm.
This simple habit guarantees the longevity of your cookware, which is a valuable asset in any kitchen. For those outfitting a new professional kitchen, getting the right foundational pieces is critical; you can find robust options from quality San Francisco restaurant equipment suppliers. Taking these few extra moments to dry your pan properly will save you a ton of restoration headaches down the road and keep your cast iron in prime condition.
How to Build the Perfect Seasoning from Scratch
So, you’ve got a new cast iron pan or maybe an old one you’re bringing back to life. This is where the magic happens. We’re going to turn that porous hunk of metal into a slick, non-stick workhorse. It’s all about a process called polymerization—applying super-thin layers of oil and baking them on at high heat.
This isn’t just about wiping some grease on a pan. It's a precise technique that transforms dull gray iron into that beautiful, semi-gloss black you see on well-loved skillets. The factory pre-seasoning is a decent starting point, sure, but building your own layers is what dials it in for serious performance. First things first, though: you have to start with a completely clean pan.
This visual guide shows just how important that first cleaning step is before you even think about oil.
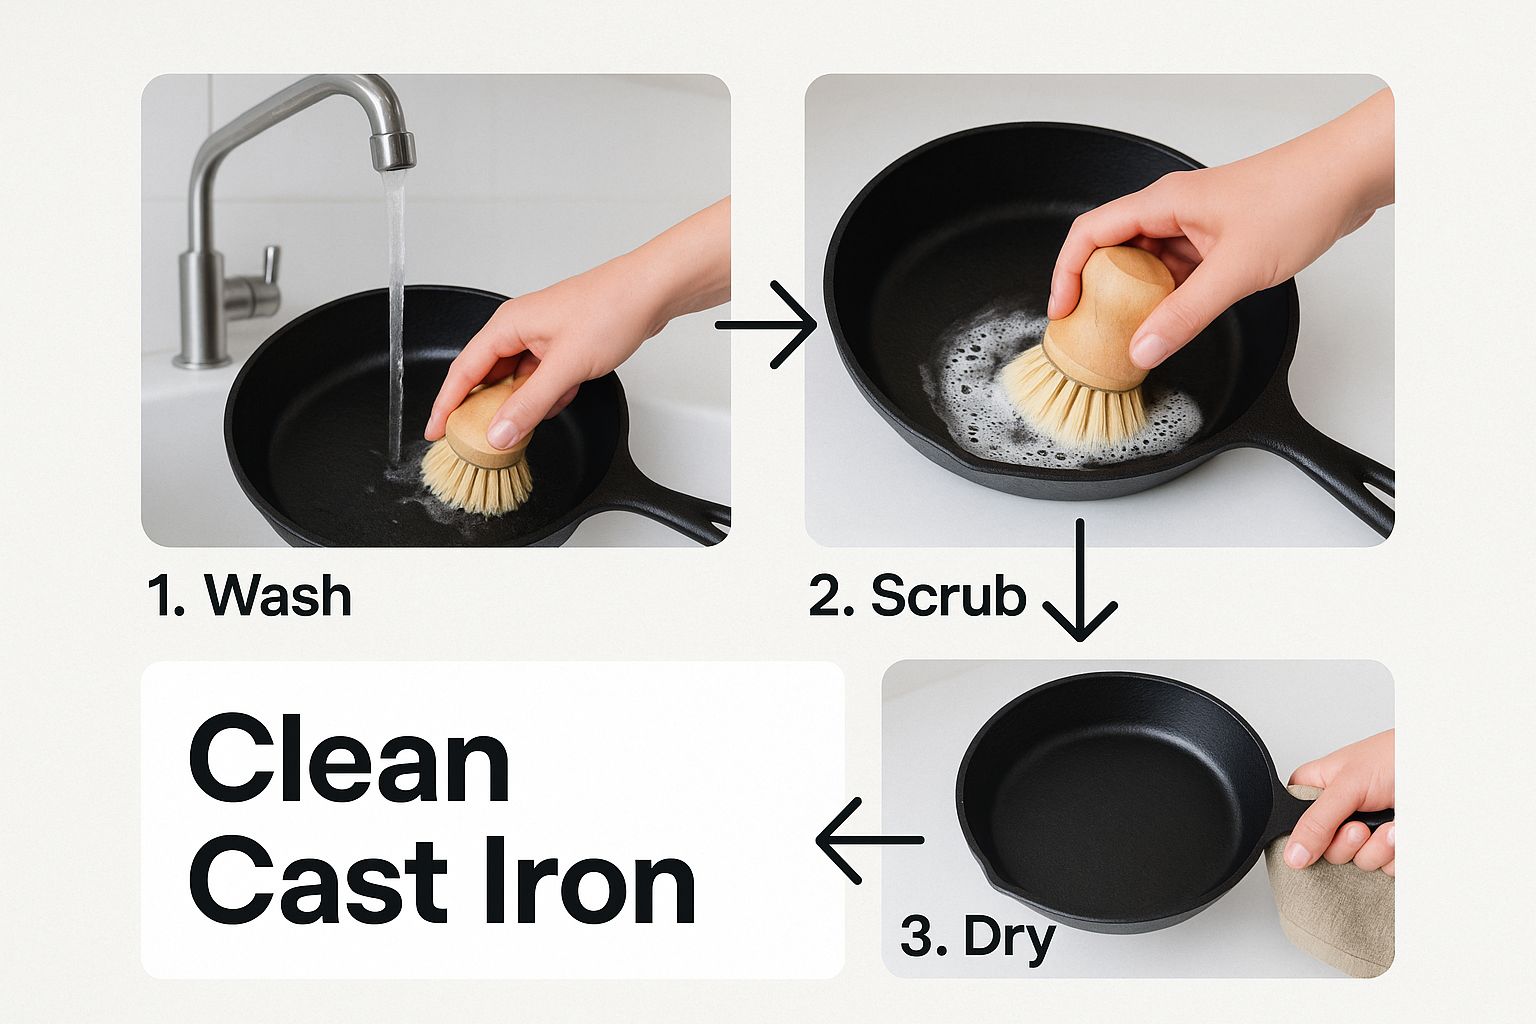
As you can see, a good scrub under hot water is non-negotiable. You have to get rid of any factory wax or flaky old seasoning. This ensures the new layers of oil bond directly to the bare iron, creating a tough, lasting surface.
Choosing the Best Oil for Seasoning Cast Iron
The oil you choose makes a huge difference. You're looking for something with a high smoke point that polymerizes well, creating a hard, slick finish—not a sticky, weak one that will just flake off later.
I see people make the same mistake over and over again: they use way too much oil.
The secret to a flawless seasoning layer isn't the amount of oil you use, but how incredibly thin you can make each application. Too much oil is the number one cause of a sticky, uneven finish that flakes off easily.
Picking the right oil can feel overwhelming, but a few stand out for their reliability in a professional kitchen environment. Each one has its own quirks, from smoke point to the kind of finish it produces.
| Oil Type | Smoke Point | Polymerization Quality | Notes for Professional Kitchens |
|---|---|---|---|
| Grapeseed Oil | ~420°F | Excellent | A go-to choice. Creates a very hard, durable, and slick finish. Not too expensive. |
| Avocado Oil | ~520°F | Very Good | The highest smoke point, which is great for high-heat seasoning. Can be pricey for large-scale use. |
| Canola/Vegetable Oil | ~400°F | Good | The workhorse option. It’s cheap, accessible, and polymerizes reliably. A solid, no-fuss choice. |
| Lard | ~375°F | Excellent | The traditional choice. Creates a beautiful, deep black seasoning but requires a lower oven temp. |
Ultimately, any of these will work beautifully if applied correctly. The key is to avoid oils with low smoke points like olive oil or butter for the seasoning process itself, as they just burn and get gummy.
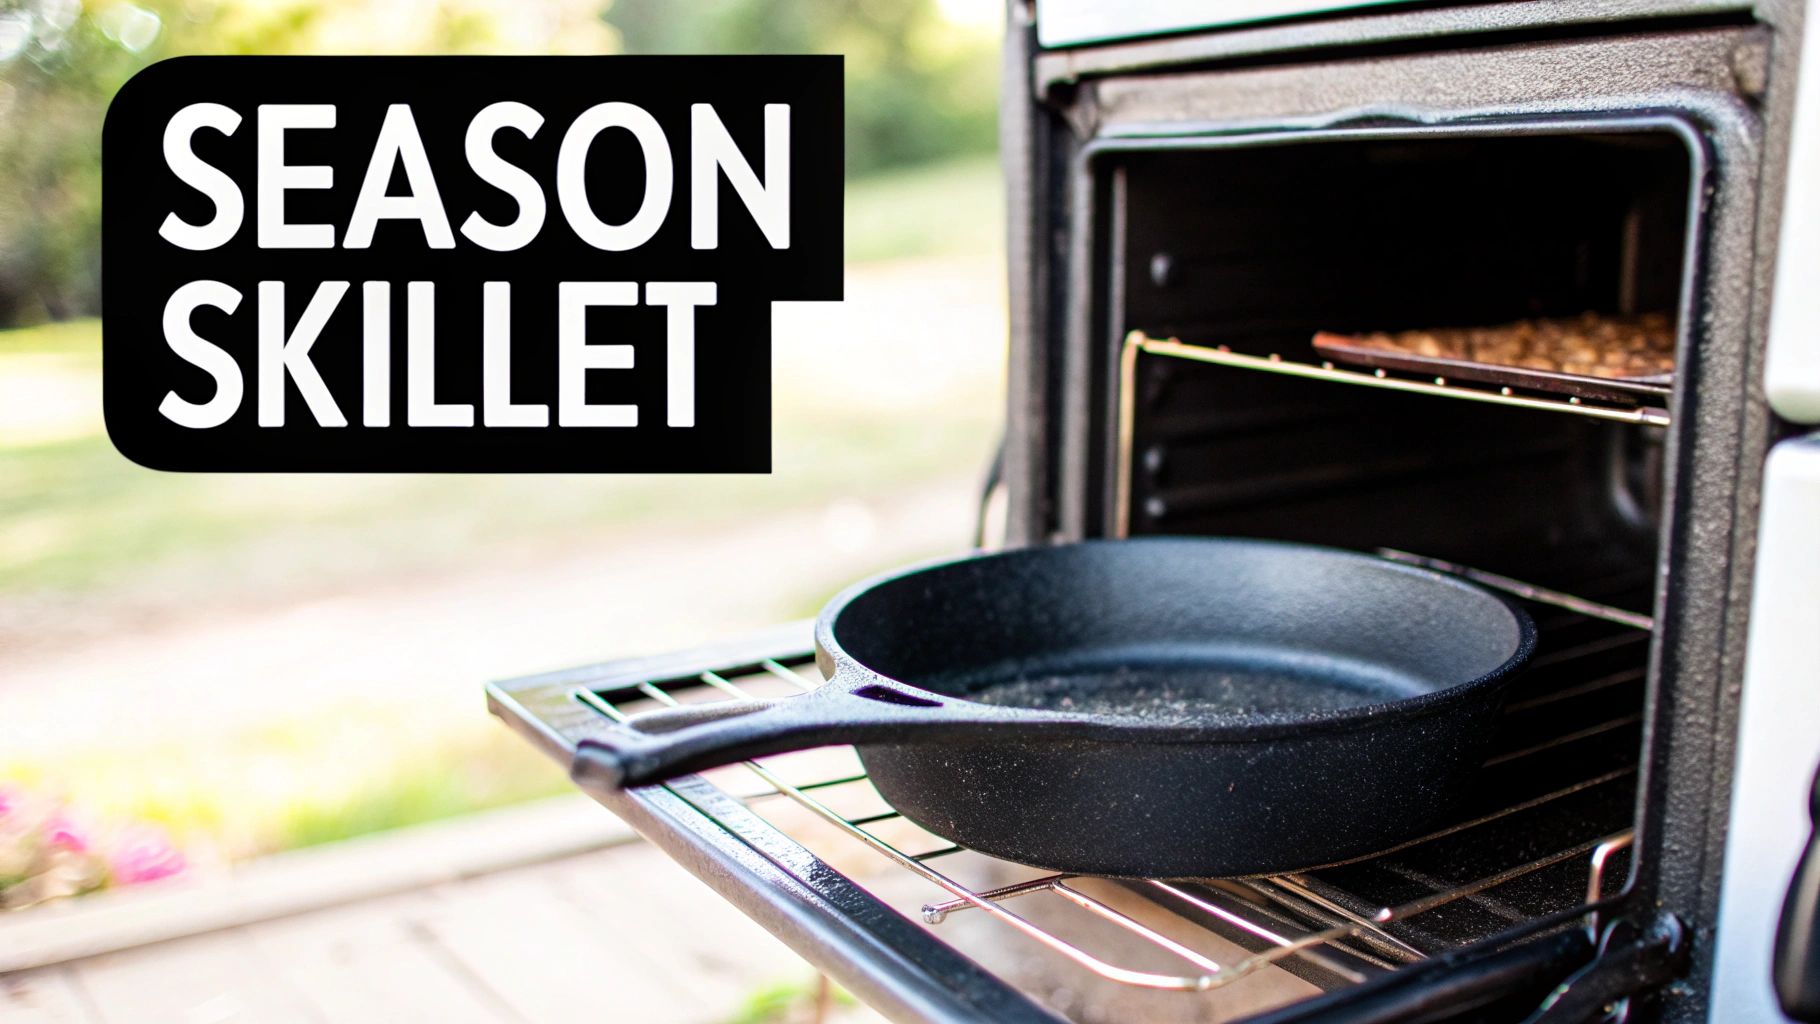
The Oven Seasoning Method
Once your pan is spotless and you have your oil, it’s time to bring the heat. Using the oven is the best way to build a strong, even base seasoning.
First, get your oven preheating to somewhere between 450-500°F (232-260°C). You want it to be significantly hotter than your oil’s smoke point to trigger polymerization.
While it heats up, pour a tiny bit of oil into the pan. Grab a lint-free cloth or a sturdy paper towel and rub that oil over every single surface—inside, outside, the handle, everywhere. Now, take a clean cloth and wipe it all back off. Seriously. It should look like there’s no oil left. Trust me, an invisible, micro-thin layer is still there, and that’s exactly what you want.
Place the pan upside down on the middle rack in your hot oven. I like to slide a baking sheet on the rack below it just in case there are any drips. Now, just let it bake for one full hour.
After the hour is up, turn off the oven and just leave the pan inside to cool down slowly and completely. Don’t rush this part.
That whole cycle creates one perfect layer of seasoning. For a brand new or freshly stripped pan, you’ll want to repeat this entire process 3-5 times. This builds that tough, non-stick foundation that will last. It's a time investment, but it’s just like choosing the right foundational pieces from quality Los Angeles restaurant equipment suppliers—getting it right from the start sets you up for a lifetime of reliable service.
Troubleshooting Common Cast Iron Issues
Even the most seasoned (pun intended) cast iron pan can act up now and then. Don't sweat it. From a random rust spot to a sticky surface that just feels wrong, these problems are part of the cast iron journey—and they're all fixable. Think of this as your field guide for getting your cookware back into prime condition.
Honestly, most cast iron headaches boil down to one of three culprits: lingering moisture, too much oil, or not enough heat during seasoning. The beautiful thing about this cookware is that nearly every issue, from annoying flakes to full-blown rust, has a straightforward fix that doesn't involve tossing the pan.
Identifying and Fixing Flaking or Uneven Seasoning
Ever see little black specks flaking off your skillet? Relax—your pan isn't falling apart. Those are just bits of seasoning that didn't quite bond to the iron, usually because the oil was laid on a bit too thick or something acidic (like tomatoes) started to lift a weaker layer.
You don't need to go nuclear and strip the whole thing. Just grab a chainmail scrubber or some steel wool and give the flaky spots a good, aggressive scrub under hot water. The goal is to knock off the loose bits and smooth things out, not remove all the seasoning.
Once you’re done scrubbing, get that pan on the stovetop to dry it completely. Then, apply a micro-thin layer of your seasoning oil, wiping it off until the pan looks almost dry again. This quick spot treatment patches up the weak area, and it'll blend in perfectly as you continue to cook with it.
Dealing with a Sticky or Gummy Surface
If your pan feels tacky to the touch, it’s a dead giveaway for one specific mistake: too much oil was left on during the cleaning and seasoning cast iron process. When the oil layer is too heavy, it can’t fully polymerize into that slick, hard coating we're all after. Instead, you get a half-baked, gummy mess.
The fix for a sticky pan is simple but counterintuitive heat. Place the sticky pan upside down in an oven preheated to 450-500°F (232-260°C) and bake it for an hour. This high heat will complete the polymerization process, curing the excess oil into a hard, non-stick finish.
Let it cool down in the oven, and the surface should feel perfectly smooth and slick. If there’s still a hint of tackiness, a second hour-long bake will almost certainly finish the job.
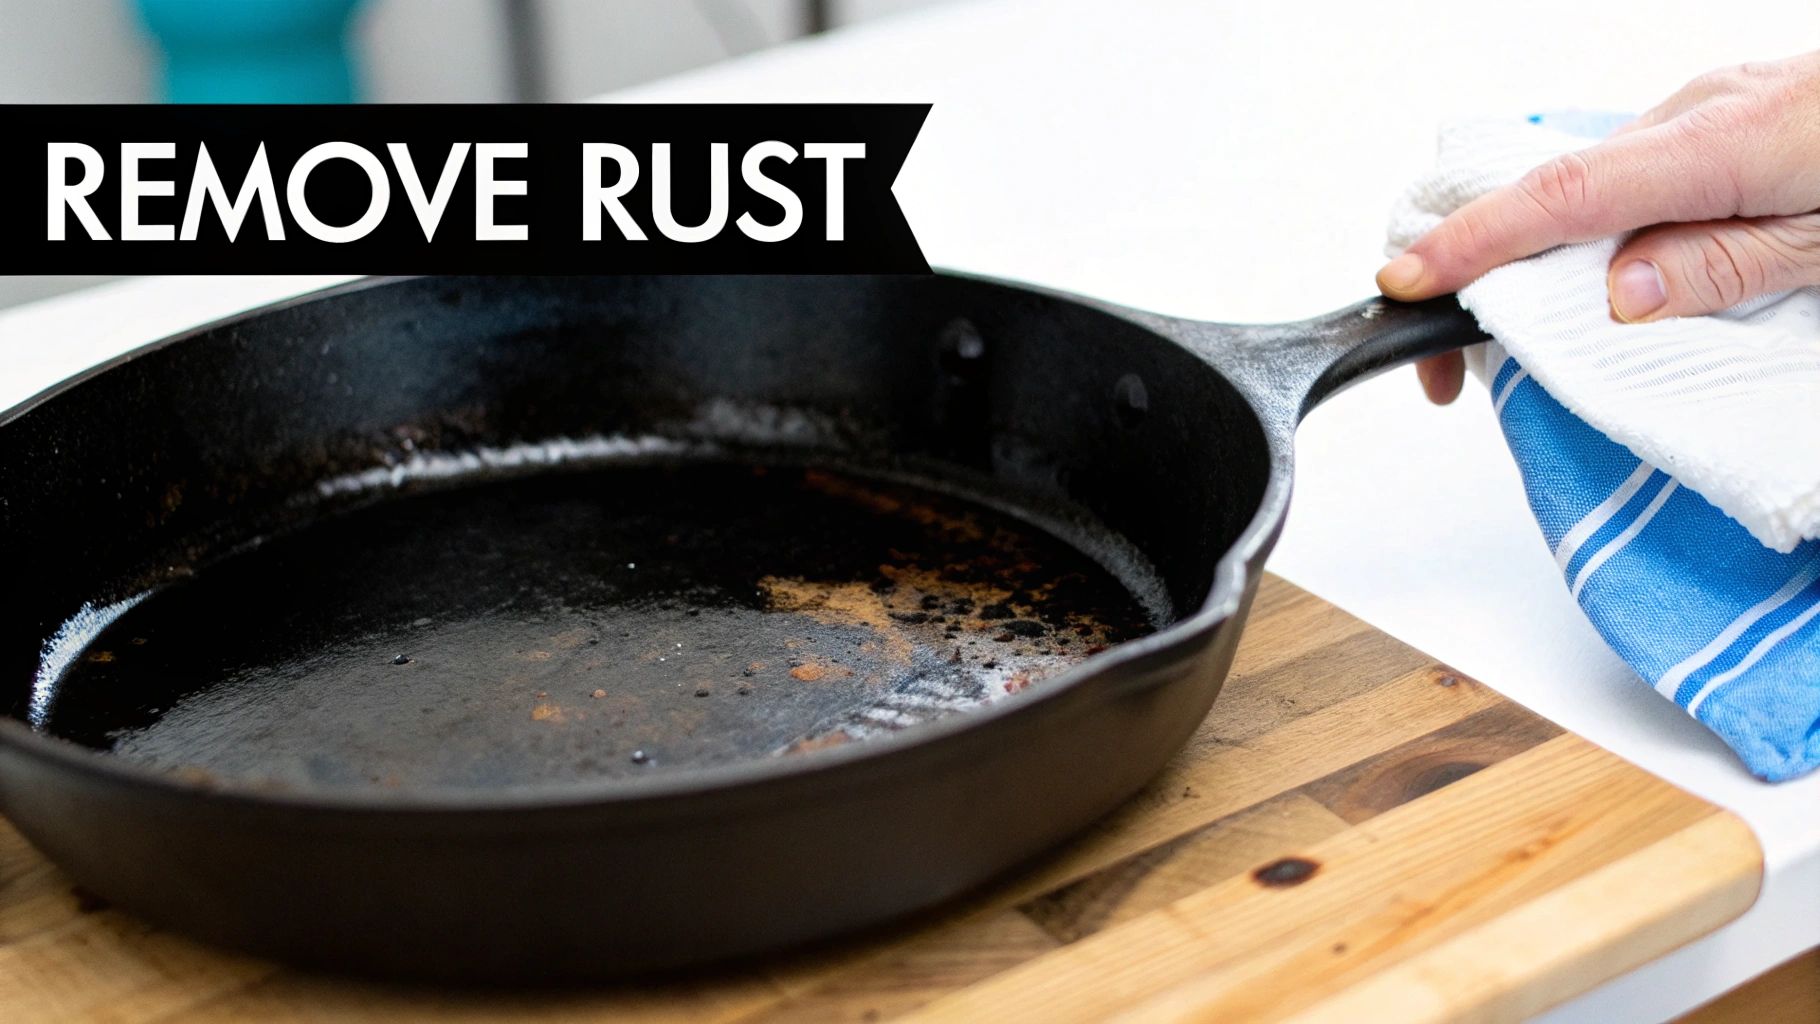
How to Conquer Rust Patches
Rust is cast iron's number one enemy, but it’s surprisingly easy to beat. It usually pops up when a pan is put away damp, stored in a humid spot, or the seasoning has been scraped away, exposing the raw iron.
For tiny spots, a simple paste of coarse salt and a splash of water is often all you need. Scrub the rust away, and you're done. If the rust is more established, though, it’s time to bring out the big guns.
- Scrub Vigorously: Get some steel wool and scrub until every last bit of orange is gone. You want to see the bare, gray metal underneath.
- Wash and Dry: Immediately wash the pan with a little soap and water to get rid of any rust dust. Then, pop it on a burner over medium heat until it's bone dry.
- Re-season Immediately: That exposed iron is now incredibly vulnerable to flash rust. You have to act fast. Apply a very thin coat of seasoning oil and get it into the oven to start the seasoning process right away to protect it.
Advanced Maintenance for Restaurant Kitchens
In a busy restaurant kitchen, taking care of cast iron isn't just a chore—it's a system. Forget about cleaning one pan at a time. The real goal is to build an efficient workflow that folds right into your daily operations without ever slowing down the line. It's about handling multiple pans at once and training your team so that perfect seasoning becomes second nature. This is where our expertise in creating blog posts and SEO content for restaurant suppliers really shines.
This shift in mindset turns your cookware from a simple tool into a bulletproof, long-term asset. When you're consistent, you'll see it in the pan's performance, you'll spend less on replacing equipment, and every dish that leaves the kitchen will meet your high standards.
Establishing an Efficient Workflow
The secret is a "batch processing" approach. You’ll want to designate a specific time and station for cast iron care, usually at the end of a shift. Instead of one cook cleaning one pan, a single team member can knock out a dozen at once.
- Scrubbing Station: Set up a dedicated sink with hot water, stiff brushes, and chainmail scrubbers. This lets you power through the scrubbing in quick succession.
- Drying Zone: After a quick rinse, line the pans up on a large flattop or across a few low-heat burners. This evaporates every last drop of moisture simultaneously.
- Oiling and Storage: While the pans are still warm, apply a micro-thin layer of oil. One person can easily wipe down the whole stack, getting them ready for storage in just a few minutes.
This assembly-line method for cleaning and seasoning cast iron saves a massive amount of time and guarantees every pan gets the exact same treatment. You can find all the essential tools you'll need from a quality Dallas restaurant supply provider.
Smart Storage and Team Training
How you store your cast iron is just as important as how you clean it. In a crowded kitchen, it's easy for pans to get banged up. Use heavy-duty hanging racks or dedicated shelves where pans can hang or sit individually—stacking them is a surefire way to chip that hard-earned seasoning. Make sure the storage area has good airflow to keep any lingering moisture from causing rust.
A well-trained team is your greatest asset. Create simple, visual guides for the cleaning process and post them near the dish pit. Regular, brief training sessions reinforce that proper cast iron care is a shared responsibility, not an afterthought.
This isn't just busy work; clean, well-maintained seasoning can increase your cookware's lifespan by up to 150%. This practice is so crucial that the North American cast iron market, which is projected to grow at a CAGR of about 5%, is driven by demand for durable cookware supported by these exact maintenance routines.
Of course, cast iron is just one piece of the puzzle. Understanding advanced cleaning protocols is vital for all the specialized gear in a commercial kitchen. For instance, you can explore expert tips on advanced cleaning techniques for other essential restaurant equipment, such as espresso machines.
Got Questions About Cast Iron Care?
Even with a solid cleaning and seasoning routine, questions are bound to pop up. Think of this as your quick-reference guide, where we tackle the most common challenges and myths you’ll run into in a busy kitchen. I'm here to give you clear, no-nonsense answers to help you perfect your technique.
From the great soap debate to sticky surfaces, getting these details right makes all the difference. Let’s clear up the confusion so you can keep your cookware in prime condition for years to come.
Can I Really Use Soap on My Cast Iron Skillet?
Yes, you absolutely can. This is probably the biggest myth in the cast iron world. The fear of soap is a holdover from the old days when soaps were made with harsh chemicals like lye, which would absolutely strip your seasoning.
Today's mild dish detergents are completely safe for a well-seasoned pan. The key is how you use it. A small amount of soap for a quick wash is fine, but you should never let your pan soak in soapy water. The most critical steps are to rinse it thoroughly and dry it immediately on the stovetop to evaporate any moisture before it can cause rust.
Why Is My Seasoning Sticky or Flaking Off?
A sticky surface is almost always a sign of one thing: too much oil was used during the last seasoning. When the layer of oil is too thick, it can't fully polymerize into that hard, slick coating. Instead, it creates a gummy, half-cured residue that feels tacky.
Flaking, on the other hand, usually happens for a couple of reasons:
- On new pans: The factory seasoning might not have bonded perfectly, causing it to chip off as you build your own layers on top.
- On older pans: Cooking highly acidic foods (like tomato sauce) for long periods can sometimes weaken the seasoning, causing it to lift.
The fix for both problems is the same. First, scrub the pan well with a chainmail scrubber or coarse salt to get rid of the sticky gunk or loose flakes. Then, apply a micro-thin layer of your seasoning oil and wipe it away until the pan looks almost dry. A quick heat-up on the stovetop or in the oven will help patch things right up.
Expert Takeaway: A perfect seasoning layer is built from multiple, incredibly thin coats of oil. If your pan looks oily or wet before it goes into the oven, you've used too much. Always wipe it off until it appears dry to the touch.
How Often Do I Need to Fully Re-Season My Pan?
This is another common point of confusion. The truth is, if you're using your cast iron regularly and cleaning it right, you’re constantly maintaining and adding to its seasoning with every use. Each time you cook with oil or fat, you're reinforcing that protective layer.
A full-blown, oven-based re-seasoning is only necessary in a few specific situations:
- You're restoring a rusty or neglected pan from scratch.
- The seasoning has been significantly damaged or stripped away somehow.
- You just bought a new pan and want to build a more durable base than what it came with from the factory.
For daily maintenance, a simple stovetop wipe-down with oil after cleaning is more than enough. That’s all it takes to keep your skillet in fantastic, non-stick condition.
At Charbroilers.com, we understand that high-performance cookware is the backbone of any great kitchen. Equip your restaurant with durable, top-tier charbroilers designed for perfect results every time. Explore our commercial charbroiler collection at https://charbroilers.com to find the ideal model for your culinary needs.